
 Read on Twitter
How to set up a Conversion Funnel in Google Analytics for Shopify checkout
#Analytics #CRO https://abs.twimg.com/hashflags... draggable="false" alt=""> #ecommerce #conversion
Here& #39;s my 16 steps guidehttps://abs.twimg.com/emoji/v2/... draggable="false" alt="👇🏼" title="Rückhand Zeigefinger nach unten (mittelheller Hautton)" aria-label="Emoji: Rückhand Zeigefinger nach unten (mittelheller Hautton)">https://abs.twimg.com/emoji/v2/... draggable="false" alt="👇🏼" title="Rückhand Zeigefinger nach unten (mittelheller Hautton)" aria-label="Emoji: Rückhand Zeigefinger nach unten (mittelheller Hautton)">https://abs.twimg.com/emoji/v2/... draggable="false" alt="👇🏼" title="Rückhand Zeigefinger nach unten (mittelheller Hautton)" aria-label="Emoji: Rückhand Zeigefinger nach unten (mittelheller Hautton)">
#Analytics #CRO
Here& #39;s my 16 steps guide
 #ecommerce #conversion Here& #39;s my 16 steps guide https://abs.twimg.com/emoji/v2/... draggable="false" alt="👇🏼" title="Rückhand Zeigefinger nach unten (mittelheller Hautton)" aria-label="Emoji: Rückhand Zeigefinger nach unten (mittelheller Hautton)">https://abs.twimg.com/emoji/v2/... draggable="false" alt="👇🏼" title="Rückhand Zeigefinger nach unten (mittelheller Hautton)" aria-label="Emoji: Rückhand Zeigefinger nach unten (mittelheller Hautton)">https://abs.twimg.com/emoji/v2/... draggable="false" alt="👇🏼" title="Rückhand Zeigefinger nach unten (mittelheller Hautton)" aria-label="Emoji: Rückhand Zeigefinger nach unten (mittelheller Hautton)">" title="How to set up a Conversion Funnel in Google Analytics for Shopify checkout #Analytics #CRO https://abs.twimg.com/hashflags... draggable="false" alt=""> #ecommerce #conversion Here& #39;s my 16 steps guide https://abs.twimg.com/emoji/v2/... draggable="false" alt="👇🏼" title="Rückhand Zeigefinger nach unten (mittelheller Hautton)" aria-label="Emoji: Rückhand Zeigefinger nach unten (mittelheller Hautton)">https://abs.twimg.com/emoji/v2/... draggable="false" alt="👇🏼" title="Rückhand Zeigefinger nach unten (mittelheller Hautton)" aria-label="Emoji: Rückhand Zeigefinger nach unten (mittelheller Hautton)">https://abs.twimg.com/emoji/v2/... draggable="false" alt="👇🏼" title="Rückhand Zeigefinger nach unten (mittelheller Hautton)" aria-label="Emoji: Rückhand Zeigefinger nach unten (mittelheller Hautton)">" class="img-responsive" style="max-width:100%;"/>
1) Go to your Google Analytics account, click on "Admin" (left-bottom part), select your desired View (right part) and then click on “Goals”.
 Go to your Google Analytics account, click on \"Admin\" (left-bottom part), select your desired View (right part) and then click on “Goals”.")
 Go to your Google Analytics account, click on \"Admin\" (left-bottom part), select your desired View (right part) and then click on “Goals”.")
2) Create a New Goal
 Create a New Goal")
3) Use the predefined options Template or just Custom.
I prefer Custom because my needs may vary from one project to another.
 Use the predefined options Template or just Custom. I prefer Custom because my needs may vary from one project to another.")
I prefer Custom because my needs may vary from one project to another.
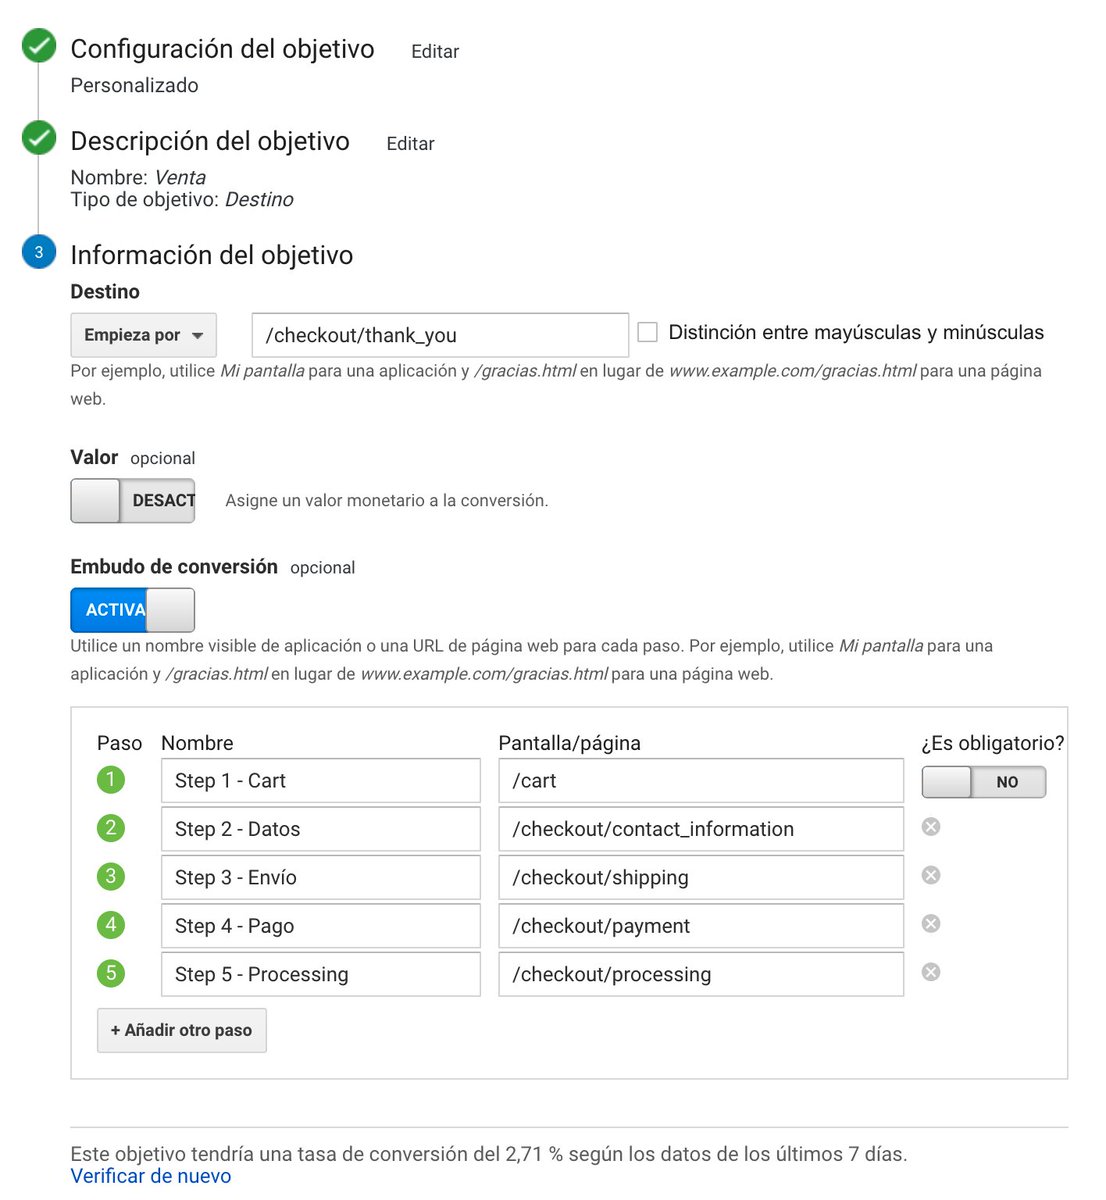
4) Name the Goal as desired, choosing a name easy to identify. For this example, I will use "Sales".
Select the "destination" goal type, in order to register the goal when a user reaches your thank you page.
 Name the Goal as desired, choosing a name easy to identify. For this example, I will use \"Sales\".Select the \"destination\" goal type, in order to register the goal when a user reaches your thank you page.")
Select the "destination" goal type, in order to register the goal when a user reaches your thank you page.
5) Enter the "thank you" page. Type exactly:
/checkout/thank_you
In the selector, you could select "equals to", but I prefer selecting "starts with" in order to register the goal in case of extra parameters.
 Enter the \"thank you\" page. Type exactly:/checkout/thank_youIn the selector, you could select \"equals to\", but I prefer selecting \"starts with\" in order to register the goal in case of extra parameters.")
/checkout/thank_you
In the selector, you could select "equals to", but I prefer selecting "starts with" in order to register the goal in case of extra parameters.
6) Let& #39;s build the funnel. Activate the "funnel" slide.
 Let& #39;s build the funnel. Activate the \"funnel\" slide.")
7) This is the list of pages that you must enter to measure the complete funnel.
Consider that these pages are virtually generated by Shopify, so you will not see them at the browser.
Let& #39;s dive below into each page.
 This is the list of pages that you must enter to measure the complete funnel.Consider that these pages are virtually generated by Shopify, so you will not see them at the browser.Let& #39;s dive below into each page.")
Consider that these pages are virtually generated by Shopify, so you will not see them at the browser.
Let& #39;s dive below into each page.
8) Step 1 - Cart
/cart
Cart page. It is important not to mark "Required", as some Shopify themes don& #39;t have it or users may not visit the shopping cart page and directly go to the checkout. Also some channels may bypass the cart.
/cart
Cart page. It is important not to mark "Required", as some Shopify themes don& #39;t have it or users may not visit the shopping cart page and directly go to the checkout. Also some channels may bypass the cart.
9) Step 2 - Contact details
/checkout/contact_information
Customer information page. It contains personal details fields such as name, e-mail, telephone, etc.
 Step 2 - Contact details/checkout/contact_informationCustomer information page. It contains personal details fields such as name, e-mail, telephone, etc.")
/checkout/contact_information
Customer information page. It contains personal details fields such as name, e-mail, telephone, etc.
10) Step 3 - Shipping
/checkout/shipping
Shipping details page. It contains shipping preferences and costs.
 Step 3 - Shipping/checkout/shippingShipping details page. It contains shipping preferences and costs.")
/checkout/shipping
Shipping details page. It contains shipping preferences and costs.
11) Step 4 - Payment
/checkout/payment
Payment page. It contains payment options. You can enter here your invoice details
 Step 4 - Payment/checkout/paymentPayment page. It contains payment options. You can enter here your invoice details")
/checkout/payment
Payment page. It contains payment options. You can enter here your invoice details
12) Step 5 - Processing
/checkout/processing
https://abs.twimg.com/emoji/v2/... draggable="false" alt="🚨" title="Polizeiautos mit drehendem Licht" aria-label="Emoji: Polizeiautos mit drehendem Licht"> Very important step. https://abs.twimg.com/emoji/v2/... draggable="false" alt="🚨" title="Polizeiautos mit drehendem Licht" aria-label="Emoji: Polizeiautos mit drehendem Licht">
This step adds confirmed orders and those ones not confirmed due to a payment failure. So this step gives you valuable information in order to detect checkout abandonment due to payment issues.
/checkout/processing
This step adds confirmed orders and those ones not confirmed due to a payment failure. So this step gives you valuable information in order to detect checkout abandonment due to payment issues.
13) Once you have configured all the previous information, you can verify the goal conversion rate (in case you have previous data).
To finish, just Save & Enjoy!
 Once you have configured all the previous information, you can verify the goal conversion rate (in case you have previous data).To finish, just Save & Enjoy!")
To finish, just Save & Enjoy!
14) How do you get insights from this Shopify Checkout Conversion Funnel set up?
Go to Conversions > Goals > Funnel visualization
 How do you get insights from this Shopify Checkout Conversion Funnel set up?Go to Conversions > Goals > Funnel visualization")
Go to Conversions > Goals > Funnel visualization
15) Select your goal at the top selector
 Select your goal at the top selector")
16) Analyze and learn from the Shopify checkout funnel.
You can get many insights from herehttps://abs.twimg.com/emoji/v2/... draggable="false" alt="👇🏼" title="Rückhand Zeigefinger nach unten (mittelheller Hautton)" aria-label="Emoji: Rückhand Zeigefinger nach unten (mittelheller Hautton)">https://abs.twimg.com/emoji/v2/... draggable="false" alt="👇🏼" title="Rückhand Zeigefinger nach unten (mittelheller Hautton)" aria-label="Emoji: Rückhand Zeigefinger nach unten (mittelheller Hautton)">https://abs.twimg.com/emoji/v2/... draggable="false" alt="👇🏼" title="Rückhand Zeigefinger nach unten (mittelheller Hautton)" aria-label="Emoji: Rückhand Zeigefinger nach unten (mittelheller Hautton)">
You can get many insights from here
") https://abs.twimg.com/emoji/v2/... draggable="false" alt="👇🏼" title="Rückhand Zeigefinger nach unten (mittelheller Hautton)" aria-label="Emoji: Rückhand Zeigefinger nach unten (mittelheller Hautton)">https://abs.twimg.com/emoji/v2/... draggable="false" alt="👇🏼" title="Rückhand Zeigefinger nach unten (mittelheller Hautton)" aria-label="Emoji: Rückhand Zeigefinger nach unten (mittelheller Hautton)">" title="16) Analyze and learn from the Shopify checkout funnel.You can get many insights from here https://abs.twimg.com/emoji/v2/... draggable="false" alt="👇🏼" title="Rückhand Zeigefinger nach unten (mittelheller Hautton)" aria-label="Emoji: Rückhand Zeigefinger nach unten (mittelheller Hautton)">https://abs.twimg.com/emoji/v2/... draggable="false" alt="👇🏼" title="Rückhand Zeigefinger nach unten (mittelheller Hautton)" aria-label="Emoji: Rückhand Zeigefinger nach unten (mittelheller Hautton)">https://abs.twimg.com/emoji/v2/... draggable="false" alt="👇🏼" title="Rückhand Zeigefinger nach unten (mittelheller Hautton)" aria-label="Emoji: Rückhand Zeigefinger nach unten (mittelheller Hautton)">" class="img-responsive" style="max-width:100%;"/>
https://abs.twimg.com/emoji/v2/... draggable="false" alt="👇🏼" title="Rückhand Zeigefinger nach unten (mittelheller Hautton)" aria-label="Emoji: Rückhand Zeigefinger nach unten (mittelheller Hautton)">https://abs.twimg.com/emoji/v2/... draggable="false" alt="👇🏼" title="Rückhand Zeigefinger nach unten (mittelheller Hautton)" aria-label="Emoji: Rückhand Zeigefinger nach unten (mittelheller Hautton)">" title="16) Analyze and learn from the Shopify checkout funnel.You can get many insights from here https://abs.twimg.com/emoji/v2/... draggable="false" alt="👇🏼" title="Rückhand Zeigefinger nach unten (mittelheller Hautton)" aria-label="Emoji: Rückhand Zeigefinger nach unten (mittelheller Hautton)">https://abs.twimg.com/emoji/v2/... draggable="false" alt="👇🏼" title="Rückhand Zeigefinger nach unten (mittelheller Hautton)" aria-label="Emoji: Rückhand Zeigefinger nach unten (mittelheller Hautton)">https://abs.twimg.com/emoji/v2/... draggable="false" alt="👇🏼" title="Rückhand Zeigefinger nach unten (mittelheller Hautton)" aria-label="Emoji: Rückhand Zeigefinger nach unten (mittelheller Hautton)">" class="img-responsive" style="max-width:100%;"/>
Congrats! You are all set up https://abs.twimg.com/emoji/v2/... draggable="false" alt="🥳" title="Partying face" aria-label="Emoji: Partying face">
This is a step by step guide in order to set up a Conversion Funnel in @googleanalytics for a @Shopify checkout.
You can build the same funnel for any Ecommerce, once you have your checkout pages.
This is a step by step guide in order to set up a Conversion Funnel in @googleanalytics for a @Shopify checkout.
You can build the same funnel for any Ecommerce, once you have your checkout pages.
When you are all set, the most important thing is to register data, analyze it carefully and propose enhancements based on detected issues.
To grow revenue, it& #39;s not about making changes copying your competitors. It about detecting your concrete problems.
To grow revenue, it& #39;s not about making changes copying your competitors. It about detecting your concrete problems.
This thread describes a part of a CRO methodology. The first stage defines a measurement plan, in which you assure your data is enough and right.
Funnels are the best tool to analyse data from your customers journeys.
Funnels are the best tool to analyse data from your customers journeys.
If you want to learn more about Conversion and how to grow your Ecommerce or any other Digital Business, don& #39;t miss my weekly newsletter MagnifiCRO
https://magnificro.com/ ">https://magnificro.com/">... (in Spanish)
Thanks for reading mehttps://abs.twimg.com/emoji/v2/... draggable="false" alt="👐🏼" title="Offene Hände (mittelheller Hautton)" aria-label="Emoji: Offene Hände (mittelheller Hautton)">
#Analytics #CROhttps://abs.twimg.com/hashflags... draggable="false" alt=""> #ecommerce #conversion
https://magnificro.com/ ">https://magnificro.com/">... (in Spanish)
Thanks for reading me
#Analytics #CRO


