Lately a ton of people have asked how we use @zapier + @Google Sheets to automate our social sharing on Twitter, LinkedIn & more.
So if you& #39;re tired of using @buffer, @hootsuite & the like.
Or if you just want to schedule 100s of shares in 30 seconds.
This thread is for you.
So if you& #39;re tired of using @buffer, @hootsuite & the like.
Or if you just want to schedule 100s of shares in 30 seconds.
This thread is for you.
Basically you three simple things for this to work:
1. A @zapier account
2. A @Google Sheet
3. A social media account
Literally that& #39;s all you need.
Well, you also need some content.
But think you have that under control.
1. A @zapier account
2. A @Google Sheet
3. A social media account
Literally that& #39;s all you need.
Well, you also need some content.
But think you have that under control.
So after you sign up for @zapier , you are going to need to link up your @Google Account & whatever social networks you want to share to.
For this exercise I& #39;m going to use my personal @Twitter account.
Before you build a Zap, I recommend you create & format your Google Sheet.
This will save you a ton of headaches.
As you can see in the image below, you should name 5 columns:
Next add some fake/test data to each of the columns
This will make setting up your Zap much easier.
For this to work you are going to have to use three different steps/apps in your Zap.
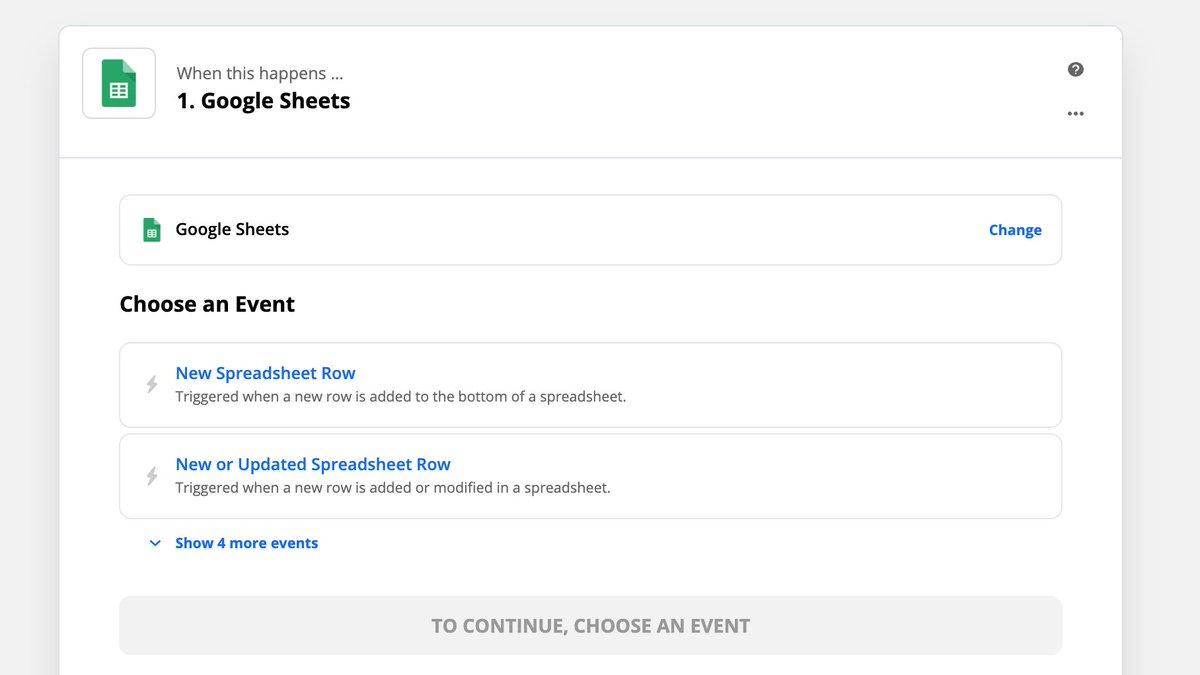
1. Google Sheet
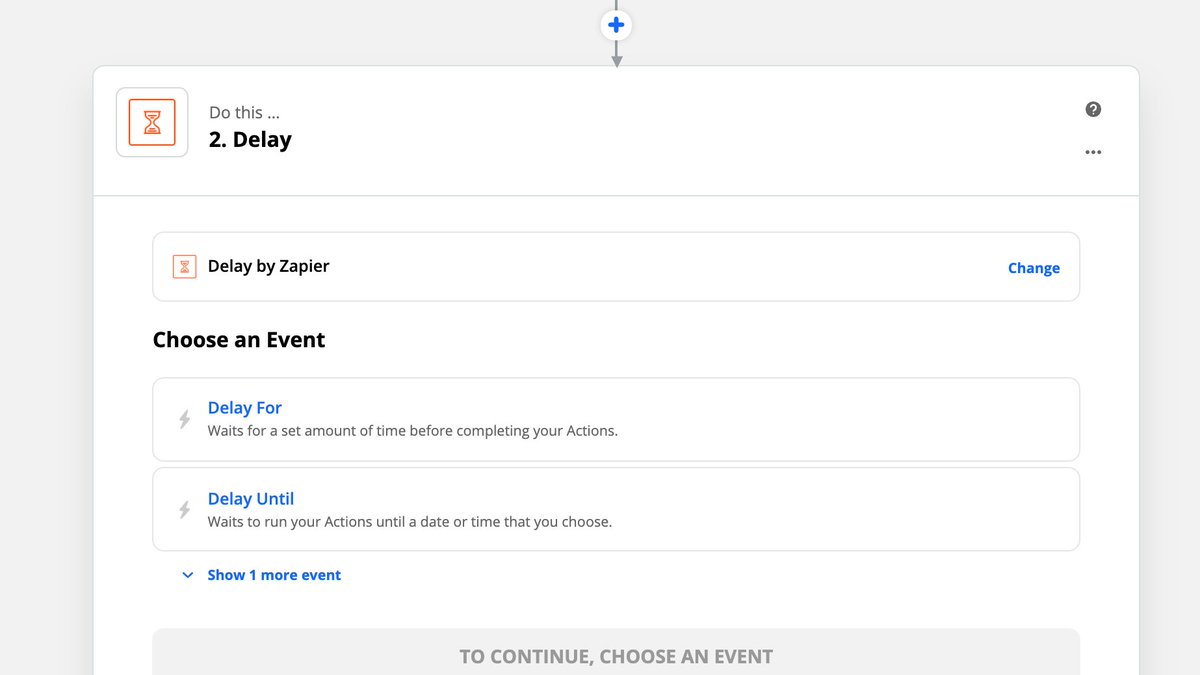
2. Delay
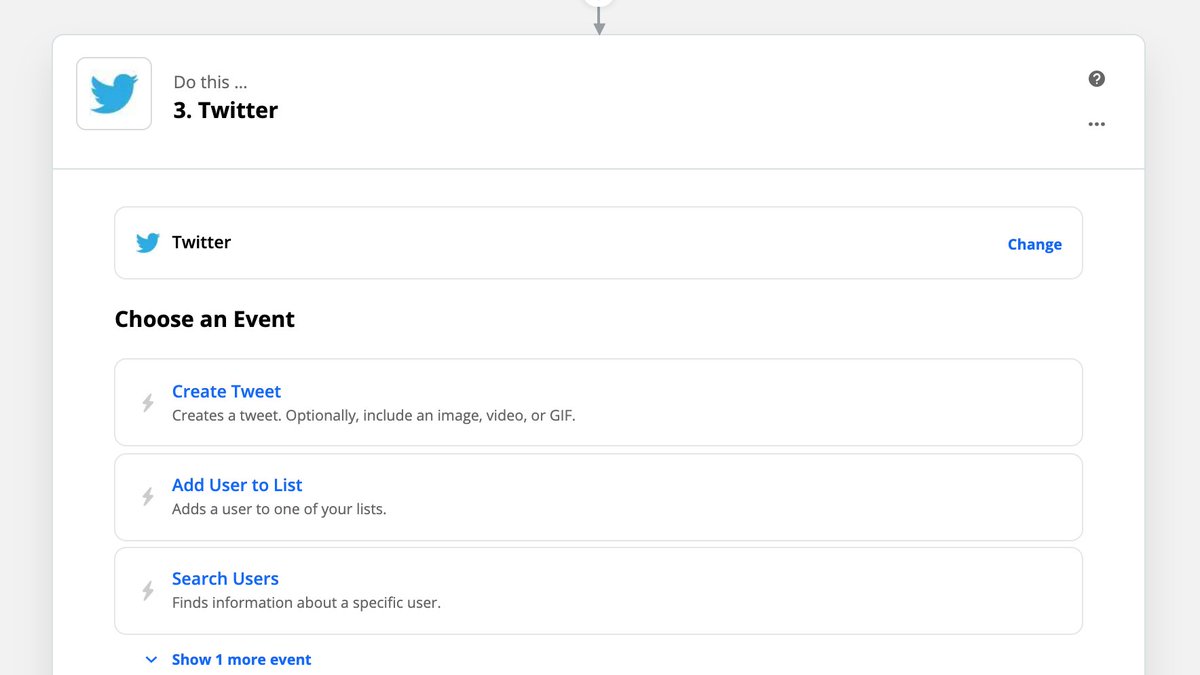
3. Twitter
So let& #39;s set up that first.
Search for the Apps & then add them in that order.
Now we can start setting up the actual Zap!
I usually leave the trigger as "Any Column"
Then click Continue!
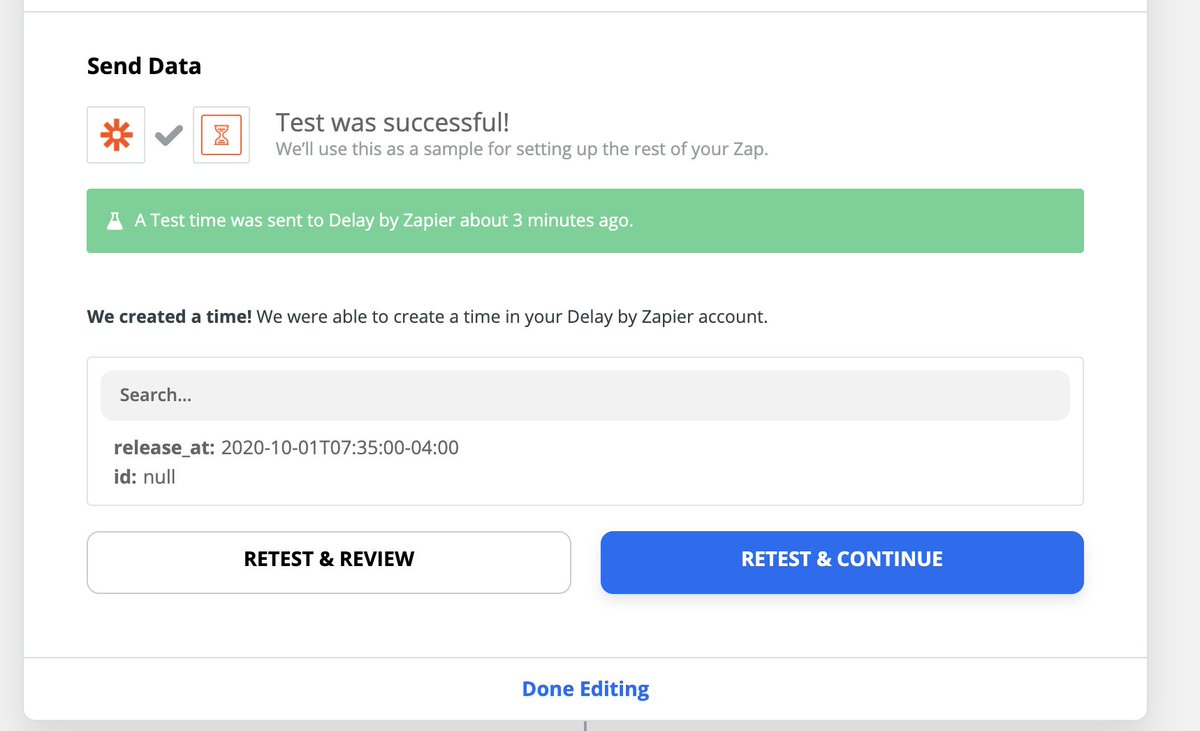
This step will make sure your content is shared at the right time.
This specific format will make sure @zapier shares your content at the specified time, not just share it all at once.
Now let& #39;s set up the actual sharing part of this automation!
If you want to share images, you can add "Image" to the Image box as well
After adding all of that, it should look like this:
After adding all of that, it should look like this:
After you click continue, make sure to Test the Zap.
As you can see, it was a successful test!
You can now set the Zap live if you want.
I would recommend writing all your shares in a separate Google Sheet tab & copying them into the Sharing sheet once they are ready.
I use one called Staging in all my automation sheets.
This allows me to get everything perfect & avoid accidental shares.
Once you have got all your shares ready in the Staging tab, just copy them over to the main page.
@zapier will see the new rows & run the Zap that you set up!
And don& #39;t worry, the Delay step makes sure your content is shared at the specified time.
Congrats you made it to the end of this LONG thread.
I use this to automate our shares for the month, but you can use it on a daily or weekly basis.
Also this process can be repeated with any social network.
I have built some for @Twitter, @LinkedIn, @Facebook & more.
I use this to automate our shares for the month, but you can use it on a daily or weekly basis.
Also this process can be repeated with any social network.
I have built some for @Twitter, @LinkedIn, @Facebook & more.
Let me know if you have any questions as well!
I am writing a post for the @zapier blog that will let me dive a bit deeper into our strategy as well.
So be on the lookout for that.
I am writing a post for the @zapier blog that will let me dive a bit deeper into our strategy as well.
So be on the lookout for that.

 Read on Twitter
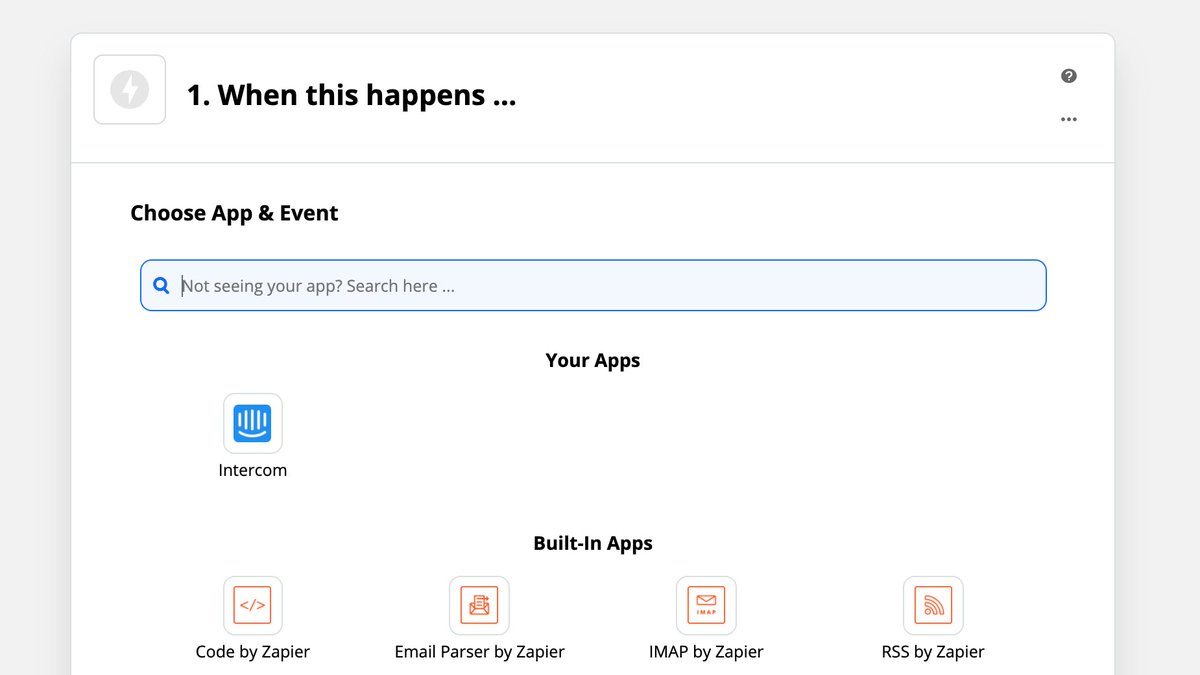
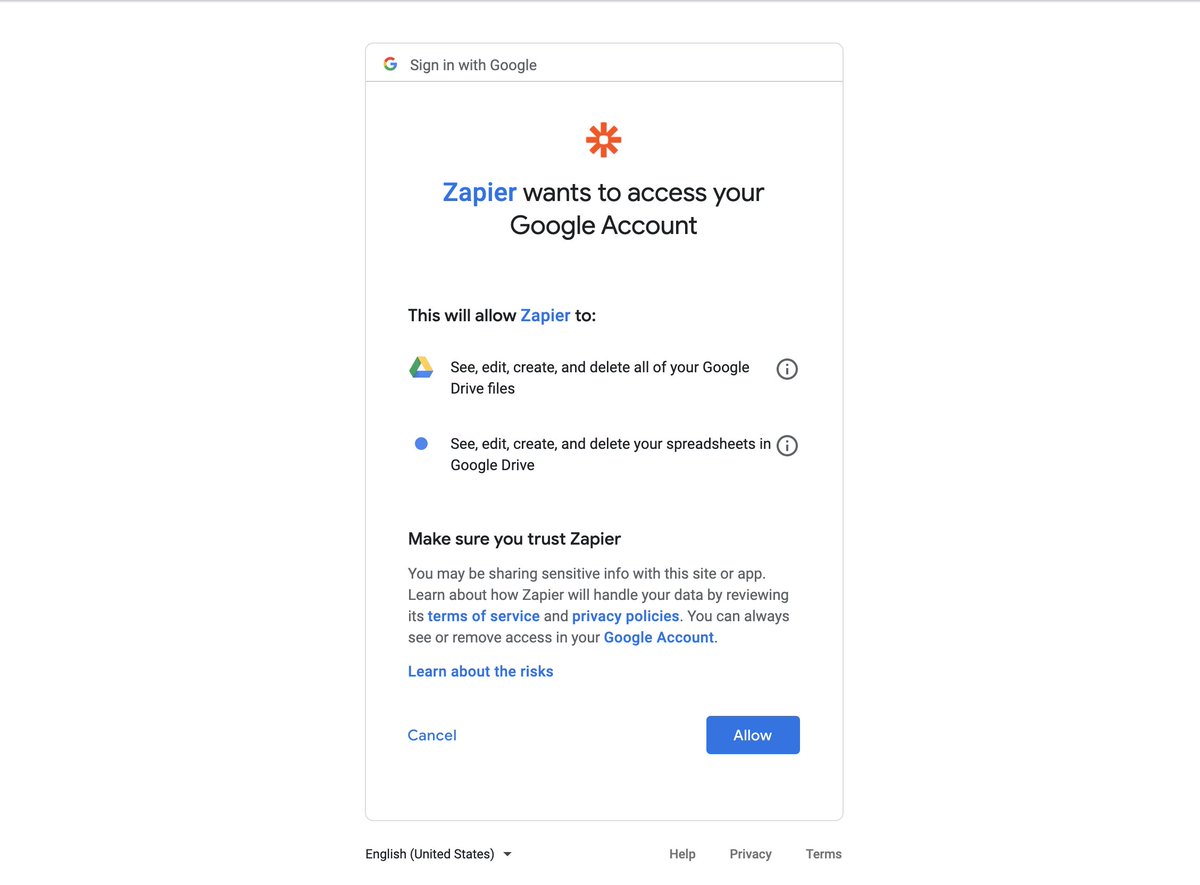 Link up your accountsSo after you sign up for @zapier , you are going to need to link up your @Google Account & whatever social networks you want to share to.For this exercise I& #39;m going to use my personal @Twitter account." title="https://abs.twimg.com/emoji/v2/... draggable="false" alt="1️⃣" title="Tastenkappe Ziffer 1" aria-label="Emoji: Tastenkappe Ziffer 1"> Link up your accountsSo after you sign up for @zapier , you are going to need to link up your @Google Account & whatever social networks you want to share to.For this exercise I& #39;m going to use my personal @Twitter account.">
 Link up your accountsSo after you sign up for @zapier , you are going to need to link up your @Google Account & whatever social networks you want to share to.For this exercise I& #39;m going to use my personal @Twitter account." title="https://abs.twimg.com/emoji/v2/... draggable="false" alt="1️⃣" title="Tastenkappe Ziffer 1" aria-label="Emoji: Tastenkappe Ziffer 1"> Link up your accountsSo after you sign up for @zapier , you are going to need to link up your @Google Account & whatever social networks you want to share to.For this exercise I& #39;m going to use my personal @Twitter account.">
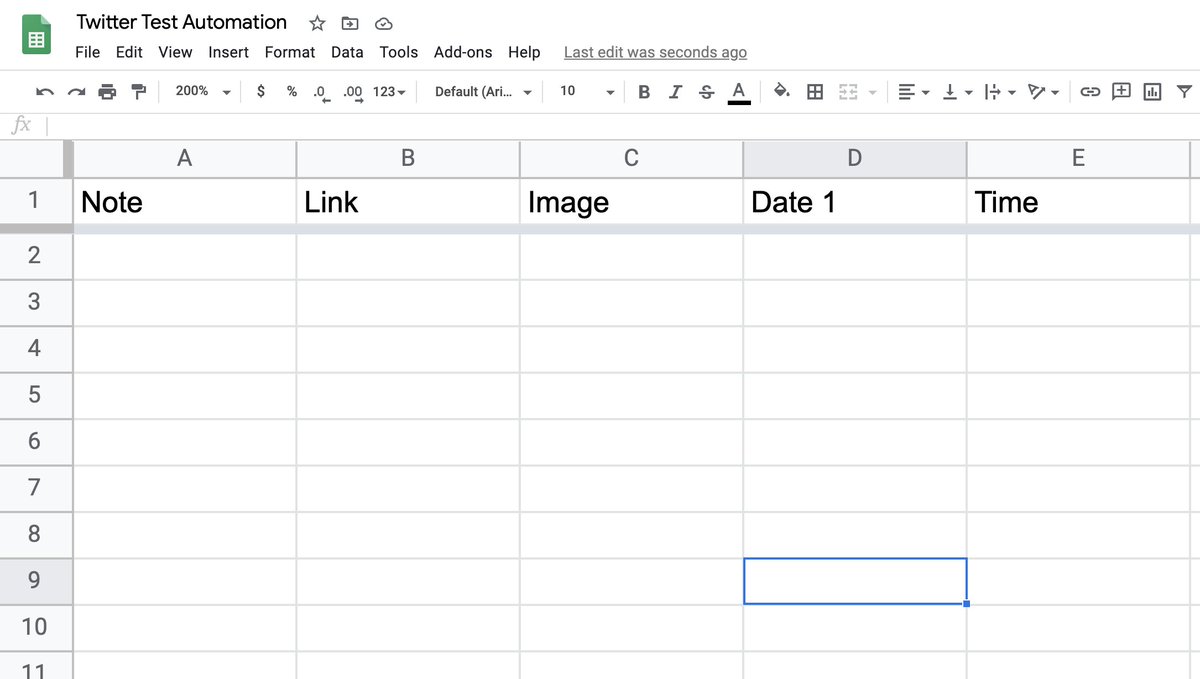 Create & format your Google SheetBefore you build a Zap, I recommend you create & format your Google Sheet.This will save you a ton of headaches.As you can see in the image below, you should name 5 columns: https://abs.twimg.com/emoji/v2/... draggable="false" alt="1️⃣" title="Tastenkappe Ziffer 1" aria-label="Emoji: Tastenkappe Ziffer 1"> Notehttps://abs.twimg.com/emoji/v2/... draggable="false" alt="2️⃣" title="Tastenkappe Ziffer 2" aria-label="Emoji: Tastenkappe Ziffer 2"> Linkhttps://abs.twimg.com/emoji/v2/... draggable="false" alt="3️⃣" title="Tastenkappe Ziffer 3" aria-label="Emoji: Tastenkappe Ziffer 3"> Imagehttps://abs.twimg.com/emoji/v2/... draggable="false" alt="4️⃣" title="Tastenkappe Ziffer 4" aria-label="Emoji: Tastenkappe Ziffer 4"> Date https://abs.twimg.com/emoji/v2/... draggable="false" alt="5️⃣" title="Tastenkappe Ziffer 5" aria-label="Emoji: Tastenkappe Ziffer 5"> Time" title="https://abs.twimg.com/emoji/v2/... draggable="false" alt="2️⃣" title="Tastenkappe Ziffer 2" aria-label="Emoji: Tastenkappe Ziffer 2"> Create & format your Google SheetBefore you build a Zap, I recommend you create & format your Google Sheet.This will save you a ton of headaches.As you can see in the image below, you should name 5 columns: https://abs.twimg.com/emoji/v2/... draggable="false" alt="1️⃣" title="Tastenkappe Ziffer 1" aria-label="Emoji: Tastenkappe Ziffer 1"> Notehttps://abs.twimg.com/emoji/v2/... draggable="false" alt="2️⃣" title="Tastenkappe Ziffer 2" aria-label="Emoji: Tastenkappe Ziffer 2"> Linkhttps://abs.twimg.com/emoji/v2/... draggable="false" alt="3️⃣" title="Tastenkappe Ziffer 3" aria-label="Emoji: Tastenkappe Ziffer 3"> Imagehttps://abs.twimg.com/emoji/v2/... draggable="false" alt="4️⃣" title="Tastenkappe Ziffer 4" aria-label="Emoji: Tastenkappe Ziffer 4"> Date https://abs.twimg.com/emoji/v2/... draggable="false" alt="5️⃣" title="Tastenkappe Ziffer 5" aria-label="Emoji: Tastenkappe Ziffer 5"> Time" class="img-responsive" style="max-width:100%;"/>
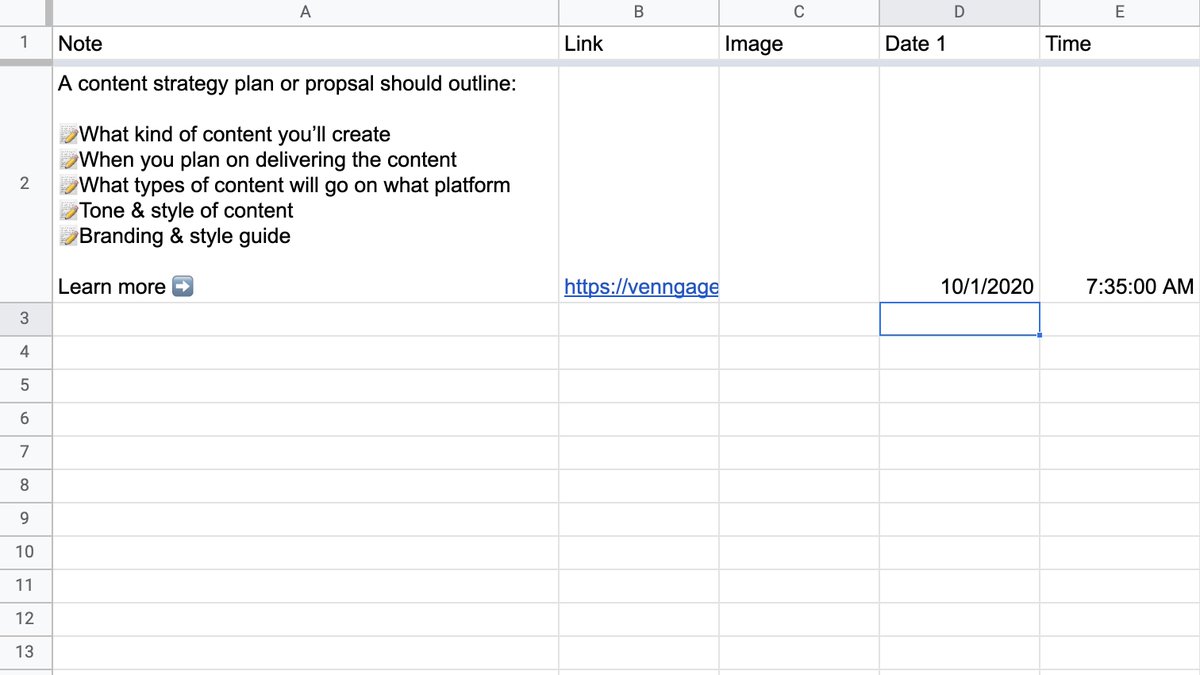 Add some test dataNext add some fake/test data to each of the columnshttps://abs.twimg.com/emoji/v2/... draggable="false" alt="1️⃣" title="Tastenkappe Ziffer 1" aria-label="Emoji: Tastenkappe Ziffer 1"> Note - Text to sharehttps://abs.twimg.com/emoji/v2/... draggable="false" alt="2️⃣" title="Tastenkappe Ziffer 2" aria-label="Emoji: Tastenkappe Ziffer 2"> Link - Link to article/blog posthttps://abs.twimg.com/emoji/v2/... draggable="false" alt="3️⃣" title="Tastenkappe Ziffer 3" aria-label="Emoji: Tastenkappe Ziffer 3"> Image - Link to image, if neededhttps://abs.twimg.com/emoji/v2/... draggable="false" alt="4️⃣" title="Tastenkappe Ziffer 4" aria-label="Emoji: Tastenkappe Ziffer 4"> Date - Date to sharehttps://abs.twimg.com/emoji/v2/... draggable="false" alt="5️⃣" title="Tastenkappe Ziffer 5" aria-label="Emoji: Tastenkappe Ziffer 5"> Time - Time to shareThis will make setting up your Zap much easier." title="https://abs.twimg.com/emoji/v2/... draggable="false" alt="3️⃣" title="Tastenkappe Ziffer 3" aria-label="Emoji: Tastenkappe Ziffer 3"> Add some test dataNext add some fake/test data to each of the columnshttps://abs.twimg.com/emoji/v2/... draggable="false" alt="1️⃣" title="Tastenkappe Ziffer 1" aria-label="Emoji: Tastenkappe Ziffer 1"> Note - Text to sharehttps://abs.twimg.com/emoji/v2/... draggable="false" alt="2️⃣" title="Tastenkappe Ziffer 2" aria-label="Emoji: Tastenkappe Ziffer 2"> Link - Link to article/blog posthttps://abs.twimg.com/emoji/v2/... draggable="false" alt="3️⃣" title="Tastenkappe Ziffer 3" aria-label="Emoji: Tastenkappe Ziffer 3"> Image - Link to image, if neededhttps://abs.twimg.com/emoji/v2/... draggable="false" alt="4️⃣" title="Tastenkappe Ziffer 4" aria-label="Emoji: Tastenkappe Ziffer 4"> Date - Date to sharehttps://abs.twimg.com/emoji/v2/... draggable="false" alt="5️⃣" title="Tastenkappe Ziffer 5" aria-label="Emoji: Tastenkappe Ziffer 5"> Time - Time to shareThis will make setting up your Zap much easier." class="img-responsive" style="max-width:100%;"/>
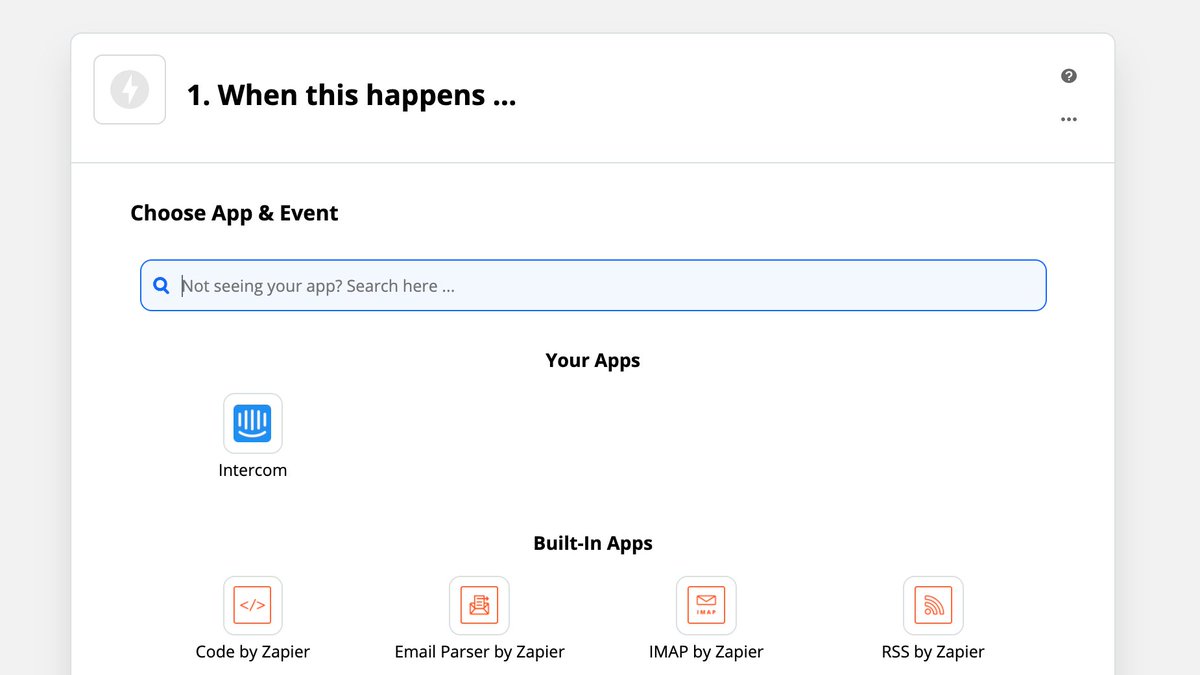 Set up sharing Zap For this to work you are going to have to use three different steps/apps in your Zap. 1. Google Sheet 2. Delay3. Twitter So let& #39;s set up that first.Search for the Apps & then add them in that order." title="https://abs.twimg.com/emoji/v2/... draggable="false" alt="4️⃣" title="Tastenkappe Ziffer 4" aria-label="Emoji: Tastenkappe Ziffer 4"> Set up sharing Zap For this to work you are going to have to use three different steps/apps in your Zap. 1. Google Sheet 2. Delay3. Twitter So let& #39;s set up that first.Search for the Apps & then add them in that order.">
 Set up sharing Zap For this to work you are going to have to use three different steps/apps in your Zap. 1. Google Sheet 2. Delay3. Twitter So let& #39;s set up that first.Search for the Apps & then add them in that order." title="https://abs.twimg.com/emoji/v2/... draggable="false" alt="4️⃣" title="Tastenkappe Ziffer 4" aria-label="Emoji: Tastenkappe Ziffer 4"> Set up sharing Zap For this to work you are going to have to use three different steps/apps in your Zap. 1. Google Sheet 2. Delay3. Twitter So let& #39;s set up that first.Search for the Apps & then add them in that order.">
 Set up sharing Zap For this to work you are going to have to use three different steps/apps in your Zap. 1. Google Sheet 2. Delay3. Twitter So let& #39;s set up that first.Search for the Apps & then add them in that order." title="https://abs.twimg.com/emoji/v2/... draggable="false" alt="4️⃣" title="Tastenkappe Ziffer 4" aria-label="Emoji: Tastenkappe Ziffer 4"> Set up sharing Zap For this to work you are going to have to use three different steps/apps in your Zap. 1. Google Sheet 2. Delay3. Twitter So let& #39;s set up that first.Search for the Apps & then add them in that order.">
 Set up sharing Zap For this to work you are going to have to use three different steps/apps in your Zap. 1. Google Sheet 2. Delay3. Twitter So let& #39;s set up that first.Search for the Apps & then add them in that order." title="https://abs.twimg.com/emoji/v2/... draggable="false" alt="4️⃣" title="Tastenkappe Ziffer 4" aria-label="Emoji: Tastenkappe Ziffer 4"> Set up sharing Zap For this to work you are going to have to use three different steps/apps in your Zap. 1. Google Sheet 2. Delay3. Twitter So let& #39;s set up that first.Search for the Apps & then add them in that order.">
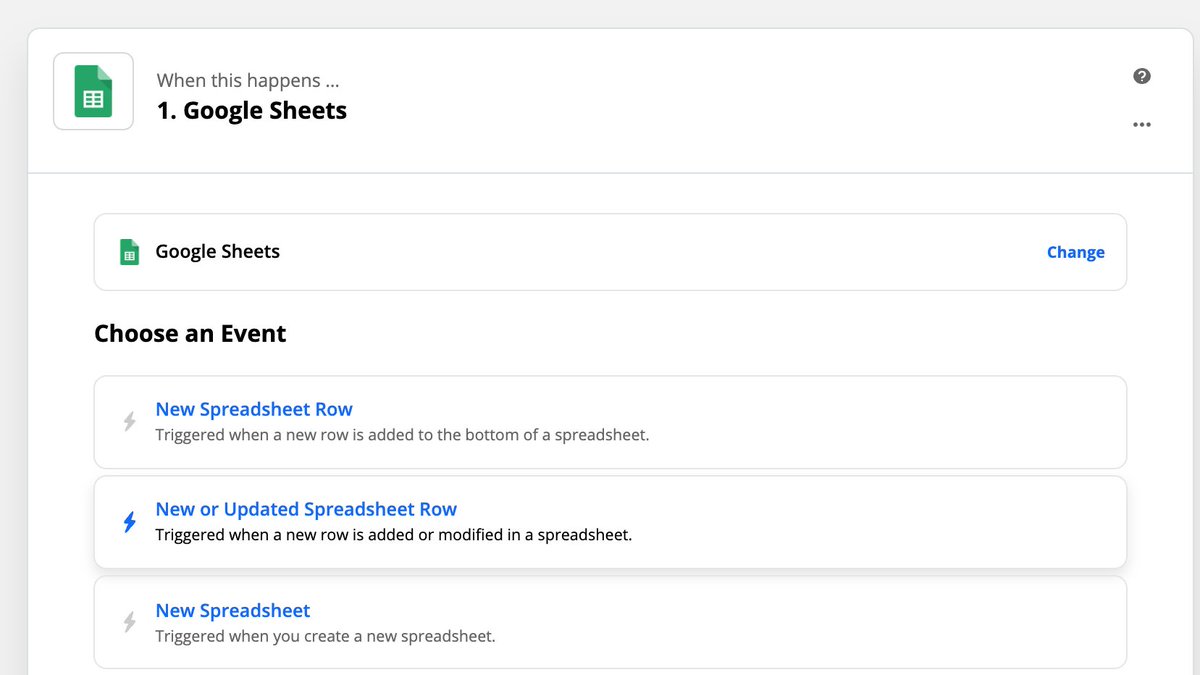 Set up your Google Sheet stepNow we can start setting up the actual Zap!https://abs.twimg.com/emoji/v2/... draggable="false" alt="✅" title="Fettes weißes Häkchen" aria-label="Emoji: Fettes weißes Häkchen"> Select "New or Updated Row" as the triggerhttps://abs.twimg.com/emoji/v2/... draggable="false" alt="✅" title="Fettes weißes Häkchen" aria-label="Emoji: Fettes weißes Häkchen"> Select the right Google Sheethttps://abs.twimg.com/emoji/v2/... draggable="false" alt="✅" title="Fettes weißes Häkchen" aria-label="Emoji: Fettes weißes Häkchen"> Select the right Worksheethttps://abs.twimg.com/emoji/v2/... draggable="false" alt="✅" title="Fettes weißes Häkchen" aria-label="Emoji: Fettes weißes Häkchen"> Set the trigger columnI usually leave the trigger as "Any Column"Then click Continue!" title="https://abs.twimg.com/emoji/v2/... draggable="false" alt="5️⃣" title="Tastenkappe Ziffer 5" aria-label="Emoji: Tastenkappe Ziffer 5"> Set up your Google Sheet stepNow we can start setting up the actual Zap!https://abs.twimg.com/emoji/v2/... draggable="false" alt="✅" title="Fettes weißes Häkchen" aria-label="Emoji: Fettes weißes Häkchen"> Select "New or Updated Row" as the triggerhttps://abs.twimg.com/emoji/v2/... draggable="false" alt="✅" title="Fettes weißes Häkchen" aria-label="Emoji: Fettes weißes Häkchen"> Select the right Google Sheethttps://abs.twimg.com/emoji/v2/... draggable="false" alt="✅" title="Fettes weißes Häkchen" aria-label="Emoji: Fettes weißes Häkchen"> Select the right Worksheethttps://abs.twimg.com/emoji/v2/... draggable="false" alt="✅" title="Fettes weißes Häkchen" aria-label="Emoji: Fettes weißes Häkchen"> Set the trigger columnI usually leave the trigger as "Any Column"Then click Continue!">
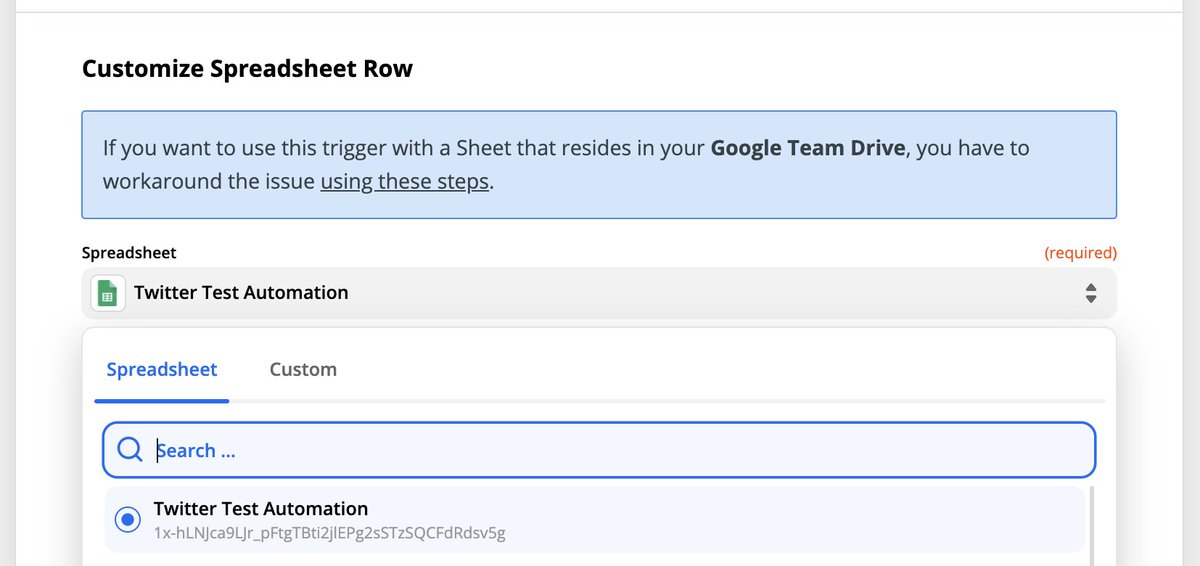 Set up your Google Sheet stepNow we can start setting up the actual Zap!https://abs.twimg.com/emoji/v2/... draggable="false" alt="✅" title="Fettes weißes Häkchen" aria-label="Emoji: Fettes weißes Häkchen"> Select "New or Updated Row" as the triggerhttps://abs.twimg.com/emoji/v2/... draggable="false" alt="✅" title="Fettes weißes Häkchen" aria-label="Emoji: Fettes weißes Häkchen"> Select the right Google Sheethttps://abs.twimg.com/emoji/v2/... draggable="false" alt="✅" title="Fettes weißes Häkchen" aria-label="Emoji: Fettes weißes Häkchen"> Select the right Worksheethttps://abs.twimg.com/emoji/v2/... draggable="false" alt="✅" title="Fettes weißes Häkchen" aria-label="Emoji: Fettes weißes Häkchen"> Set the trigger columnI usually leave the trigger as "Any Column"Then click Continue!" title="https://abs.twimg.com/emoji/v2/... draggable="false" alt="5️⃣" title="Tastenkappe Ziffer 5" aria-label="Emoji: Tastenkappe Ziffer 5"> Set up your Google Sheet stepNow we can start setting up the actual Zap!https://abs.twimg.com/emoji/v2/... draggable="false" alt="✅" title="Fettes weißes Häkchen" aria-label="Emoji: Fettes weißes Häkchen"> Select "New or Updated Row" as the triggerhttps://abs.twimg.com/emoji/v2/... draggable="false" alt="✅" title="Fettes weißes Häkchen" aria-label="Emoji: Fettes weißes Häkchen"> Select the right Google Sheethttps://abs.twimg.com/emoji/v2/... draggable="false" alt="✅" title="Fettes weißes Häkchen" aria-label="Emoji: Fettes weißes Häkchen"> Select the right Worksheethttps://abs.twimg.com/emoji/v2/... draggable="false" alt="✅" title="Fettes weißes Häkchen" aria-label="Emoji: Fettes weißes Häkchen"> Set the trigger columnI usually leave the trigger as "Any Column"Then click Continue!">
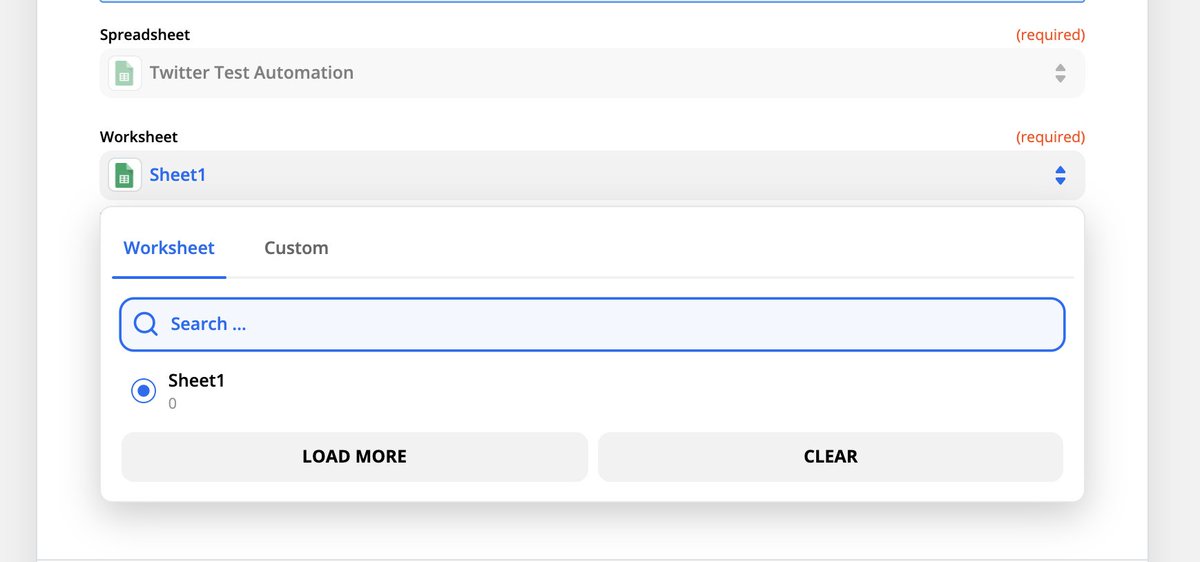 Set up your Google Sheet stepNow we can start setting up the actual Zap!https://abs.twimg.com/emoji/v2/... draggable="false" alt="✅" title="Fettes weißes Häkchen" aria-label="Emoji: Fettes weißes Häkchen"> Select "New or Updated Row" as the triggerhttps://abs.twimg.com/emoji/v2/... draggable="false" alt="✅" title="Fettes weißes Häkchen" aria-label="Emoji: Fettes weißes Häkchen"> Select the right Google Sheethttps://abs.twimg.com/emoji/v2/... draggable="false" alt="✅" title="Fettes weißes Häkchen" aria-label="Emoji: Fettes weißes Häkchen"> Select the right Worksheethttps://abs.twimg.com/emoji/v2/... draggable="false" alt="✅" title="Fettes weißes Häkchen" aria-label="Emoji: Fettes weißes Häkchen"> Set the trigger columnI usually leave the trigger as "Any Column"Then click Continue!" title="https://abs.twimg.com/emoji/v2/... draggable="false" alt="5️⃣" title="Tastenkappe Ziffer 5" aria-label="Emoji: Tastenkappe Ziffer 5"> Set up your Google Sheet stepNow we can start setting up the actual Zap!https://abs.twimg.com/emoji/v2/... draggable="false" alt="✅" title="Fettes weißes Häkchen" aria-label="Emoji: Fettes weißes Häkchen"> Select "New or Updated Row" as the triggerhttps://abs.twimg.com/emoji/v2/... draggable="false" alt="✅" title="Fettes weißes Häkchen" aria-label="Emoji: Fettes weißes Häkchen"> Select the right Google Sheethttps://abs.twimg.com/emoji/v2/... draggable="false" alt="✅" title="Fettes weißes Häkchen" aria-label="Emoji: Fettes weißes Häkchen"> Select the right Worksheethttps://abs.twimg.com/emoji/v2/... draggable="false" alt="✅" title="Fettes weißes Häkchen" aria-label="Emoji: Fettes weißes Häkchen"> Set the trigger columnI usually leave the trigger as "Any Column"Then click Continue!">
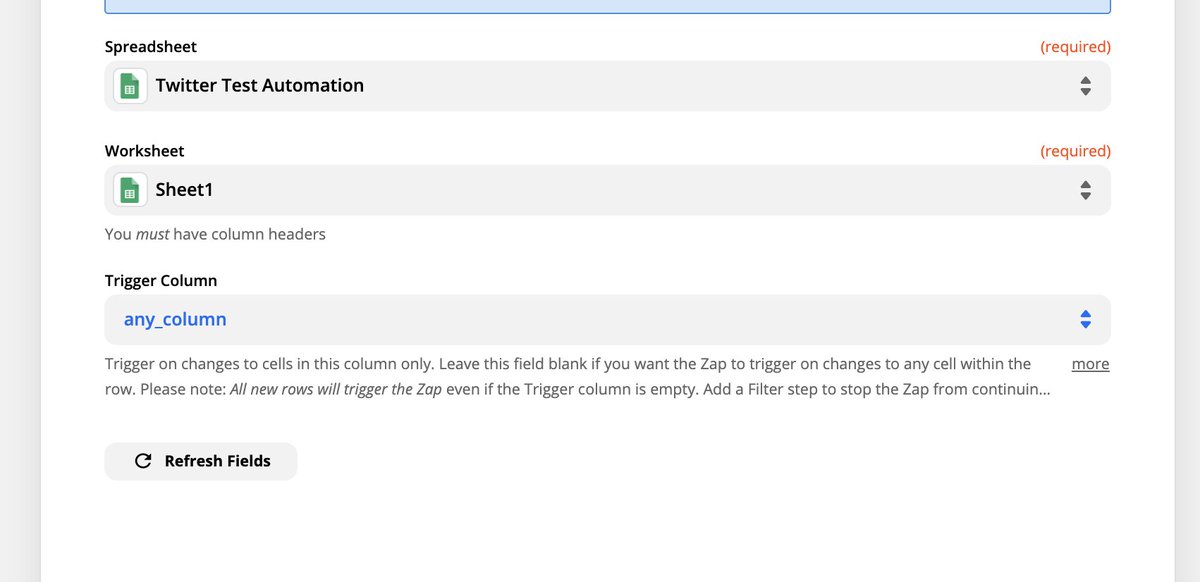 Set up your Google Sheet stepNow we can start setting up the actual Zap!https://abs.twimg.com/emoji/v2/... draggable="false" alt="✅" title="Fettes weißes Häkchen" aria-label="Emoji: Fettes weißes Häkchen"> Select "New or Updated Row" as the triggerhttps://abs.twimg.com/emoji/v2/... draggable="false" alt="✅" title="Fettes weißes Häkchen" aria-label="Emoji: Fettes weißes Häkchen"> Select the right Google Sheethttps://abs.twimg.com/emoji/v2/... draggable="false" alt="✅" title="Fettes weißes Häkchen" aria-label="Emoji: Fettes weißes Häkchen"> Select the right Worksheethttps://abs.twimg.com/emoji/v2/... draggable="false" alt="✅" title="Fettes weißes Häkchen" aria-label="Emoji: Fettes weißes Häkchen"> Set the trigger columnI usually leave the trigger as "Any Column"Then click Continue!" title="https://abs.twimg.com/emoji/v2/... draggable="false" alt="5️⃣" title="Tastenkappe Ziffer 5" aria-label="Emoji: Tastenkappe Ziffer 5"> Set up your Google Sheet stepNow we can start setting up the actual Zap!https://abs.twimg.com/emoji/v2/... draggable="false" alt="✅" title="Fettes weißes Häkchen" aria-label="Emoji: Fettes weißes Häkchen"> Select "New or Updated Row" as the triggerhttps://abs.twimg.com/emoji/v2/... draggable="false" alt="✅" title="Fettes weißes Häkchen" aria-label="Emoji: Fettes weißes Häkchen"> Select the right Google Sheethttps://abs.twimg.com/emoji/v2/... draggable="false" alt="✅" title="Fettes weißes Häkchen" aria-label="Emoji: Fettes weißes Häkchen"> Select the right Worksheethttps://abs.twimg.com/emoji/v2/... draggable="false" alt="✅" title="Fettes weißes Häkchen" aria-label="Emoji: Fettes weißes Häkchen"> Set the trigger columnI usually leave the trigger as "Any Column"Then click Continue!">
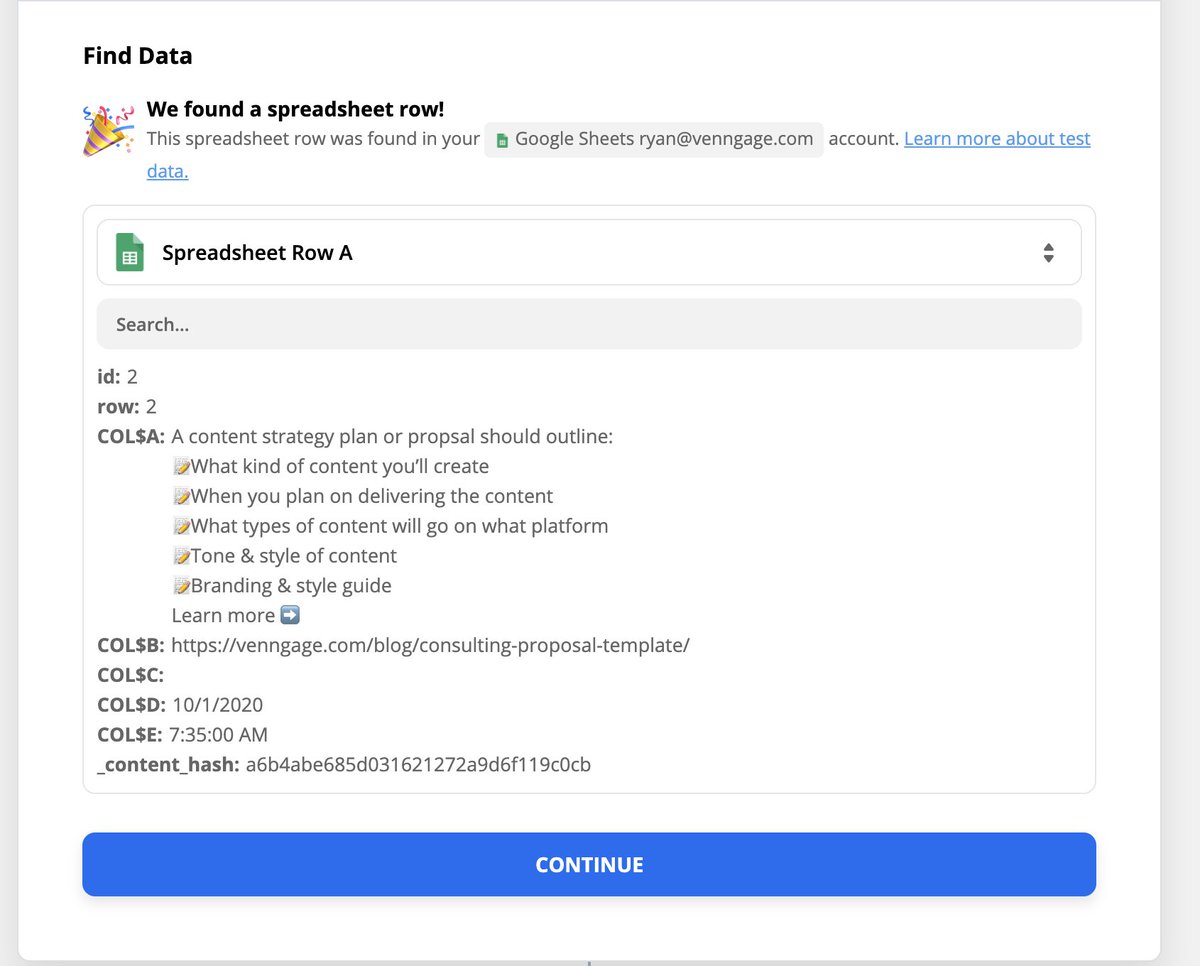
 Set up the Delay stepThis step will make sure your content is shared at the right time. https://abs.twimg.com/emoji/v2/... draggable="false" alt="✅" title="Fettes weißes Häkchen" aria-label="Emoji: Fettes weißes Häkchen"> Select Delay Untilhttps://abs.twimg.com/emoji/v2/... draggable="false" alt="✅" title="Fettes weißes Häkchen" aria-label="Emoji: Fettes weißes Häkchen"> Add Date https://abs.twimg.com/emoji/v2/... draggable="false" alt="✅" title="Fettes weißes Häkchen" aria-label="Emoji: Fettes weißes Häkchen"> Add "at" https://abs.twimg.com/emoji/v2/... draggable="false" alt="✅" title="Fettes weißes Häkchen" aria-label="Emoji: Fettes weißes Häkchen"> Add Time This specific format will make sure @zapier shares your content at the specified time, not just share it all at once." title="https://abs.twimg.com/emoji/v2/... draggable="false" alt="6️⃣" title="Tastenkappe Ziffer 6" aria-label="Emoji: Tastenkappe Ziffer 6"> Set up the Delay stepThis step will make sure your content is shared at the right time. https://abs.twimg.com/emoji/v2/... draggable="false" alt="✅" title="Fettes weißes Häkchen" aria-label="Emoji: Fettes weißes Häkchen"> Select Delay Untilhttps://abs.twimg.com/emoji/v2/... draggable="false" alt="✅" title="Fettes weißes Häkchen" aria-label="Emoji: Fettes weißes Häkchen"> Add Date https://abs.twimg.com/emoji/v2/... draggable="false" alt="✅" title="Fettes weißes Häkchen" aria-label="Emoji: Fettes weißes Häkchen"> Add "at" https://abs.twimg.com/emoji/v2/... draggable="false" alt="✅" title="Fettes weißes Häkchen" aria-label="Emoji: Fettes weißes Häkchen"> Add Time This specific format will make sure @zapier shares your content at the specified time, not just share it all at once.">
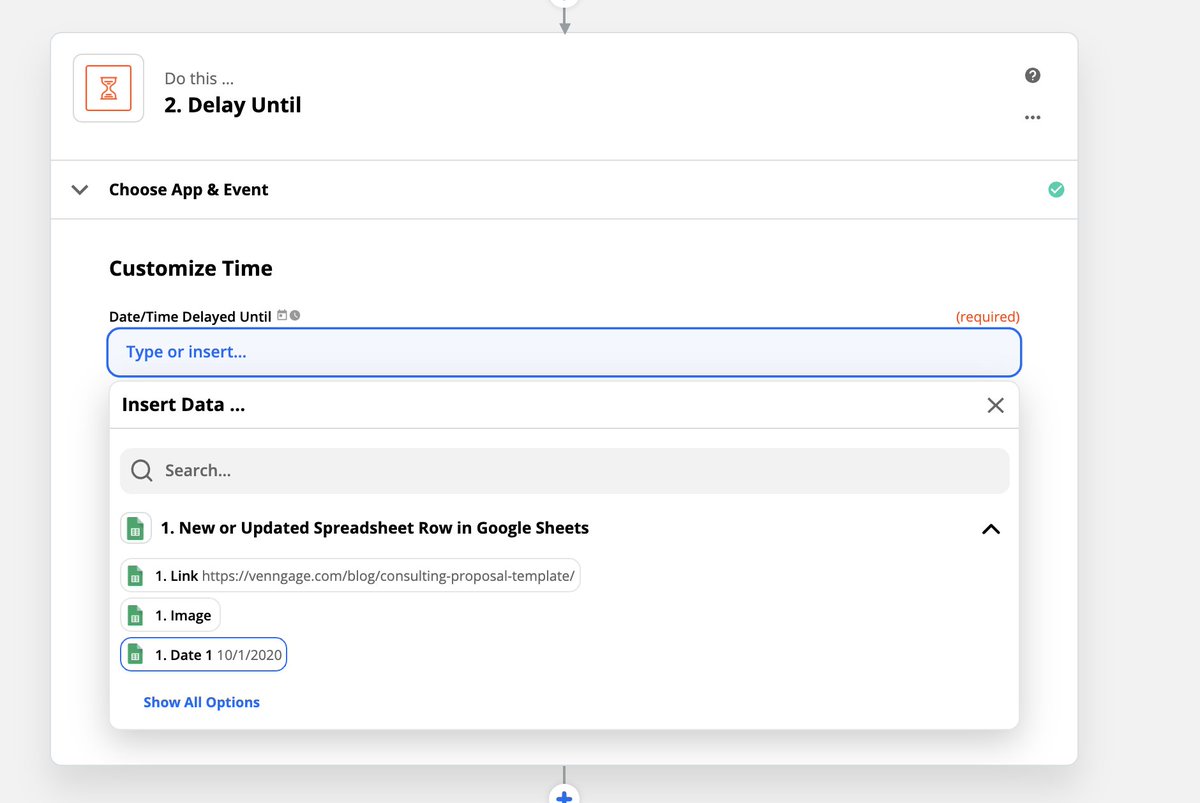 Set up the Delay stepThis step will make sure your content is shared at the right time. https://abs.twimg.com/emoji/v2/... draggable="false" alt="✅" title="Fettes weißes Häkchen" aria-label="Emoji: Fettes weißes Häkchen"> Select Delay Untilhttps://abs.twimg.com/emoji/v2/... draggable="false" alt="✅" title="Fettes weißes Häkchen" aria-label="Emoji: Fettes weißes Häkchen"> Add Date https://abs.twimg.com/emoji/v2/... draggable="false" alt="✅" title="Fettes weißes Häkchen" aria-label="Emoji: Fettes weißes Häkchen"> Add "at" https://abs.twimg.com/emoji/v2/... draggable="false" alt="✅" title="Fettes weißes Häkchen" aria-label="Emoji: Fettes weißes Häkchen"> Add Time This specific format will make sure @zapier shares your content at the specified time, not just share it all at once." title="https://abs.twimg.com/emoji/v2/... draggable="false" alt="6️⃣" title="Tastenkappe Ziffer 6" aria-label="Emoji: Tastenkappe Ziffer 6"> Set up the Delay stepThis step will make sure your content is shared at the right time. https://abs.twimg.com/emoji/v2/... draggable="false" alt="✅" title="Fettes weißes Häkchen" aria-label="Emoji: Fettes weißes Häkchen"> Select Delay Untilhttps://abs.twimg.com/emoji/v2/... draggable="false" alt="✅" title="Fettes weißes Häkchen" aria-label="Emoji: Fettes weißes Häkchen"> Add Date https://abs.twimg.com/emoji/v2/... draggable="false" alt="✅" title="Fettes weißes Häkchen" aria-label="Emoji: Fettes weißes Häkchen"> Add "at" https://abs.twimg.com/emoji/v2/... draggable="false" alt="✅" title="Fettes weißes Häkchen" aria-label="Emoji: Fettes weißes Häkchen"> Add Time This specific format will make sure @zapier shares your content at the specified time, not just share it all at once.">
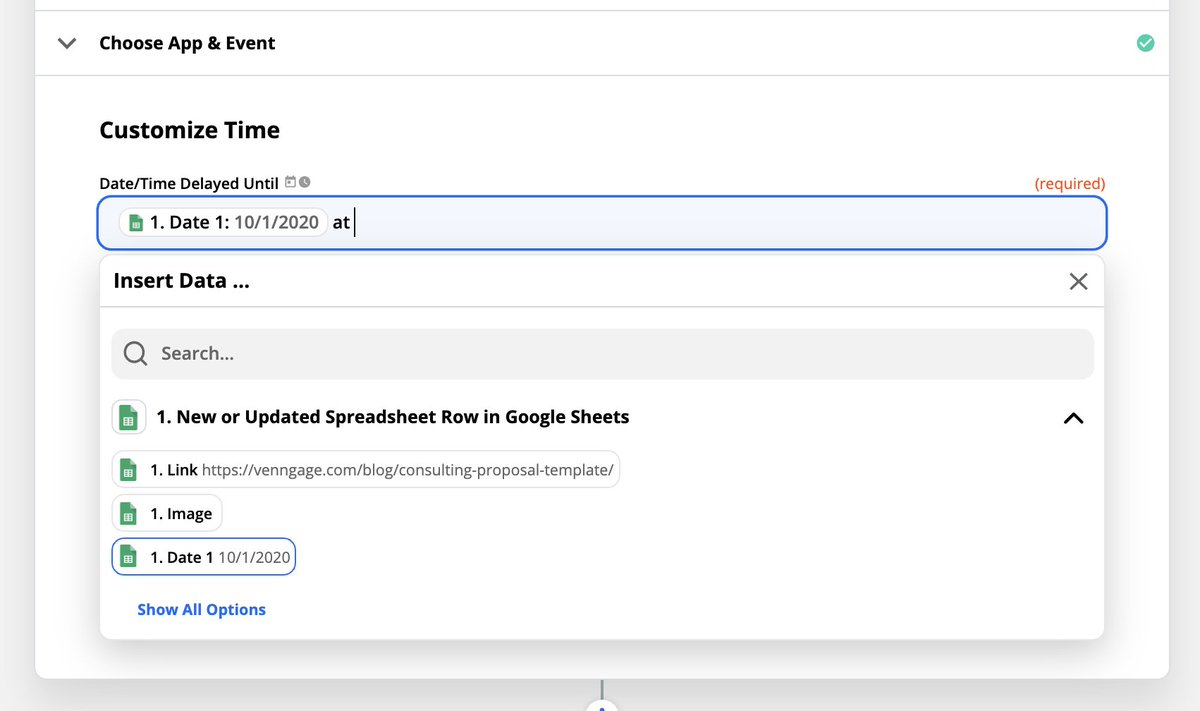 Set up the Delay stepThis step will make sure your content is shared at the right time. https://abs.twimg.com/emoji/v2/... draggable="false" alt="✅" title="Fettes weißes Häkchen" aria-label="Emoji: Fettes weißes Häkchen"> Select Delay Untilhttps://abs.twimg.com/emoji/v2/... draggable="false" alt="✅" title="Fettes weißes Häkchen" aria-label="Emoji: Fettes weißes Häkchen"> Add Date https://abs.twimg.com/emoji/v2/... draggable="false" alt="✅" title="Fettes weißes Häkchen" aria-label="Emoji: Fettes weißes Häkchen"> Add "at" https://abs.twimg.com/emoji/v2/... draggable="false" alt="✅" title="Fettes weißes Häkchen" aria-label="Emoji: Fettes weißes Häkchen"> Add Time This specific format will make sure @zapier shares your content at the specified time, not just share it all at once." title="https://abs.twimg.com/emoji/v2/... draggable="false" alt="6️⃣" title="Tastenkappe Ziffer 6" aria-label="Emoji: Tastenkappe Ziffer 6"> Set up the Delay stepThis step will make sure your content is shared at the right time. https://abs.twimg.com/emoji/v2/... draggable="false" alt="✅" title="Fettes weißes Häkchen" aria-label="Emoji: Fettes weißes Häkchen"> Select Delay Untilhttps://abs.twimg.com/emoji/v2/... draggable="false" alt="✅" title="Fettes weißes Häkchen" aria-label="Emoji: Fettes weißes Häkchen"> Add Date https://abs.twimg.com/emoji/v2/... draggable="false" alt="✅" title="Fettes weißes Häkchen" aria-label="Emoji: Fettes weißes Häkchen"> Add "at" https://abs.twimg.com/emoji/v2/... draggable="false" alt="✅" title="Fettes weißes Häkchen" aria-label="Emoji: Fettes weißes Häkchen"> Add Time This specific format will make sure @zapier shares your content at the specified time, not just share it all at once.">
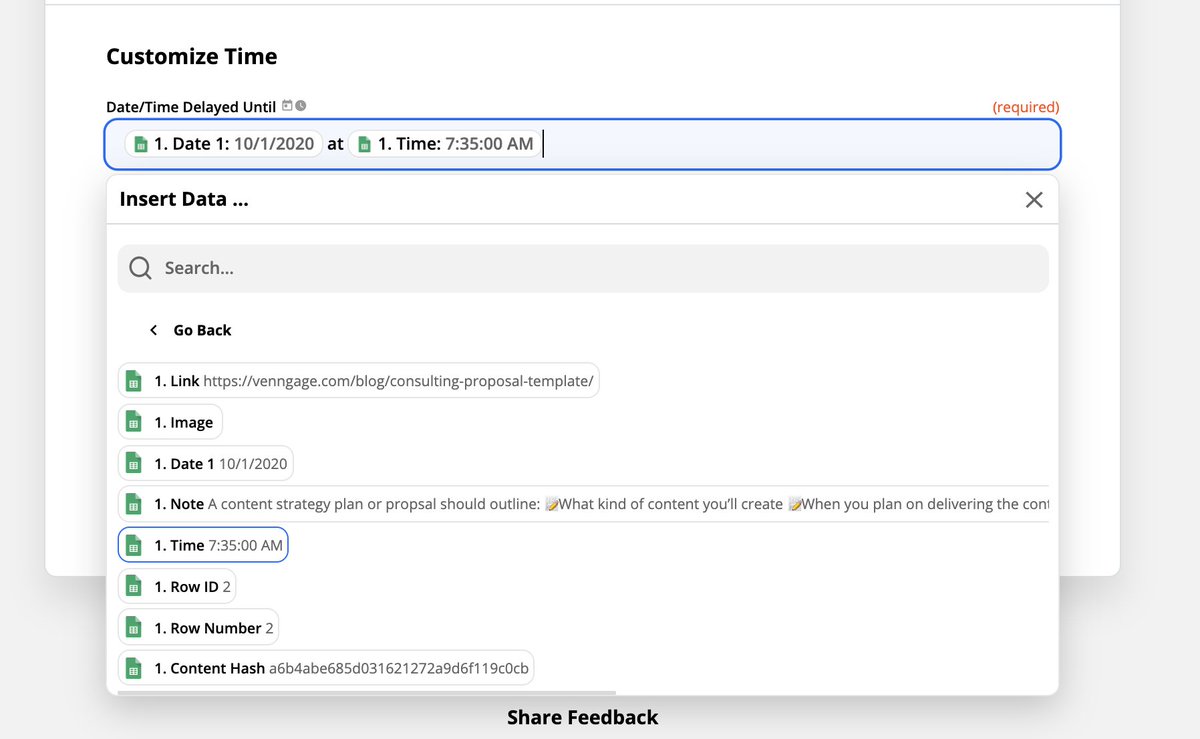 Set up the Delay stepThis step will make sure your content is shared at the right time. https://abs.twimg.com/emoji/v2/... draggable="false" alt="✅" title="Fettes weißes Häkchen" aria-label="Emoji: Fettes weißes Häkchen"> Select Delay Untilhttps://abs.twimg.com/emoji/v2/... draggable="false" alt="✅" title="Fettes weißes Häkchen" aria-label="Emoji: Fettes weißes Häkchen"> Add Date https://abs.twimg.com/emoji/v2/... draggable="false" alt="✅" title="Fettes weißes Häkchen" aria-label="Emoji: Fettes weißes Häkchen"> Add "at" https://abs.twimg.com/emoji/v2/... draggable="false" alt="✅" title="Fettes weißes Häkchen" aria-label="Emoji: Fettes weißes Häkchen"> Add Time This specific format will make sure @zapier shares your content at the specified time, not just share it all at once." title="https://abs.twimg.com/emoji/v2/... draggable="false" alt="6️⃣" title="Tastenkappe Ziffer 6" aria-label="Emoji: Tastenkappe Ziffer 6"> Set up the Delay stepThis step will make sure your content is shared at the right time. https://abs.twimg.com/emoji/v2/... draggable="false" alt="✅" title="Fettes weißes Häkchen" aria-label="Emoji: Fettes weißes Häkchen"> Select Delay Untilhttps://abs.twimg.com/emoji/v2/... draggable="false" alt="✅" title="Fettes weißes Häkchen" aria-label="Emoji: Fettes weißes Häkchen"> Add Date https://abs.twimg.com/emoji/v2/... draggable="false" alt="✅" title="Fettes weißes Häkchen" aria-label="Emoji: Fettes weißes Häkchen"> Add "at" https://abs.twimg.com/emoji/v2/... draggable="false" alt="✅" title="Fettes weißes Häkchen" aria-label="Emoji: Fettes weißes Häkchen"> Add Time This specific format will make sure @zapier shares your content at the specified time, not just share it all at once.">
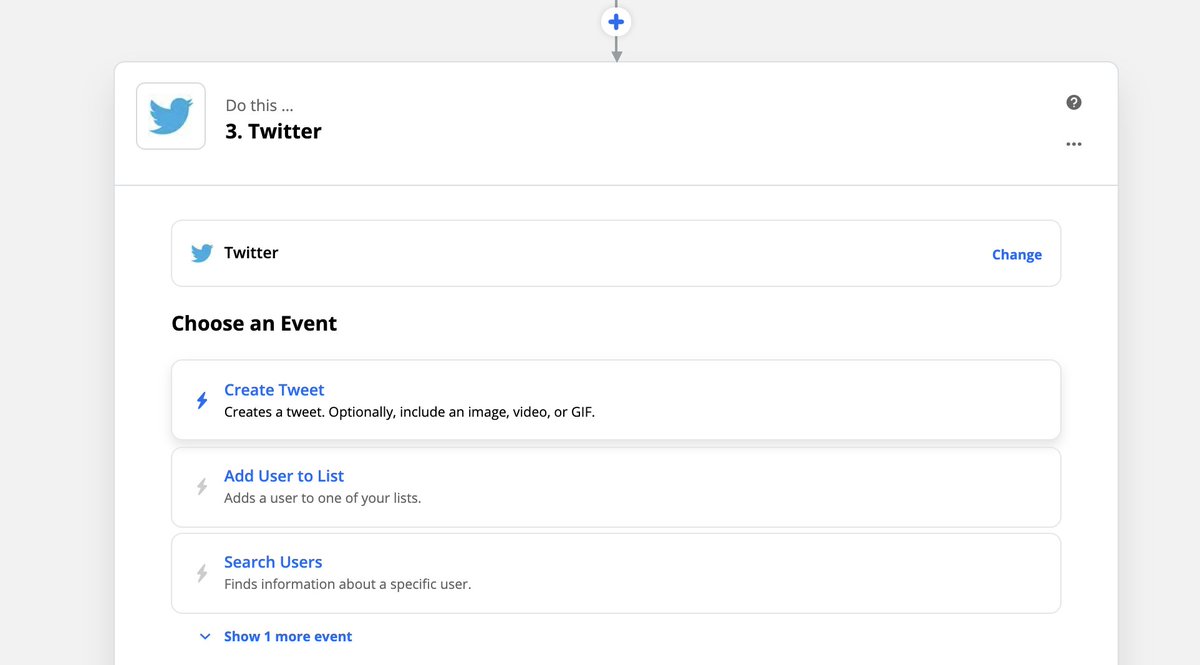 Set up the Twitter stepNow let& #39;s set up the actual sharing part of this automation!https://abs.twimg.com/emoji/v2/... draggable="false" alt="✅" title="Fettes weißes Häkchen" aria-label="Emoji: Fettes weißes Häkchen"> Select Create Tweethttps://abs.twimg.com/emoji/v2/... draggable="false" alt="✅" title="Fettes weißes Häkchen" aria-label="Emoji: Fettes weißes Häkchen"> Select your accounthttps://abs.twimg.com/emoji/v2/... draggable="false" alt="✅" title="Fettes weißes Häkchen" aria-label="Emoji: Fettes weißes Häkchen"> Insert the "Note" info to the Message boxhttps://abs.twimg.com/emoji/v2/... draggable="false" alt="✅" title="Fettes weißes Häkchen" aria-label="Emoji: Fettes weißes Häkchen"> Add a line, then add "Link" to the Message box too" title="https://abs.twimg.com/emoji/v2/... draggable="false" alt="7️⃣" title="Tastenkappe Ziffer 7" aria-label="Emoji: Tastenkappe Ziffer 7"> Set up the Twitter stepNow let& #39;s set up the actual sharing part of this automation!https://abs.twimg.com/emoji/v2/... draggable="false" alt="✅" title="Fettes weißes Häkchen" aria-label="Emoji: Fettes weißes Häkchen"> Select Create Tweethttps://abs.twimg.com/emoji/v2/... draggable="false" alt="✅" title="Fettes weißes Häkchen" aria-label="Emoji: Fettes weißes Häkchen"> Select your accounthttps://abs.twimg.com/emoji/v2/... draggable="false" alt="✅" title="Fettes weißes Häkchen" aria-label="Emoji: Fettes weißes Häkchen"> Insert the "Note" info to the Message boxhttps://abs.twimg.com/emoji/v2/... draggable="false" alt="✅" title="Fettes weißes Häkchen" aria-label="Emoji: Fettes weißes Häkchen"> Add a line, then add "Link" to the Message box too">
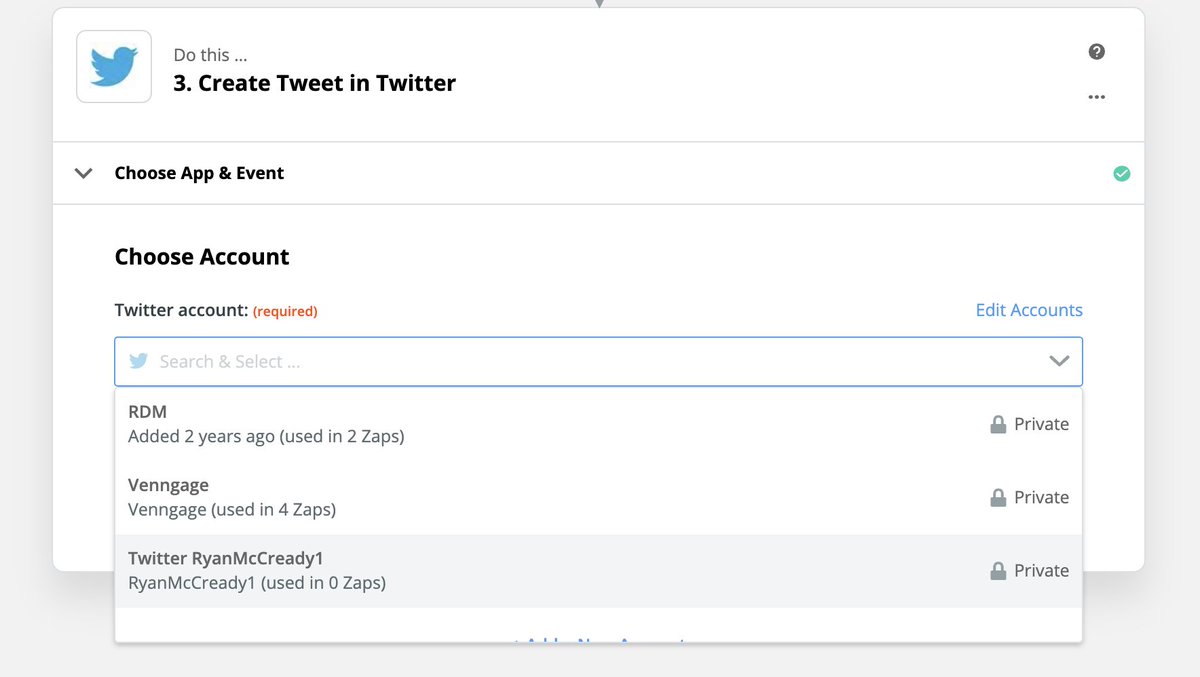 Set up the Twitter stepNow let& #39;s set up the actual sharing part of this automation!https://abs.twimg.com/emoji/v2/... draggable="false" alt="✅" title="Fettes weißes Häkchen" aria-label="Emoji: Fettes weißes Häkchen"> Select Create Tweethttps://abs.twimg.com/emoji/v2/... draggable="false" alt="✅" title="Fettes weißes Häkchen" aria-label="Emoji: Fettes weißes Häkchen"> Select your accounthttps://abs.twimg.com/emoji/v2/... draggable="false" alt="✅" title="Fettes weißes Häkchen" aria-label="Emoji: Fettes weißes Häkchen"> Insert the "Note" info to the Message boxhttps://abs.twimg.com/emoji/v2/... draggable="false" alt="✅" title="Fettes weißes Häkchen" aria-label="Emoji: Fettes weißes Häkchen"> Add a line, then add "Link" to the Message box too" title="https://abs.twimg.com/emoji/v2/... draggable="false" alt="7️⃣" title="Tastenkappe Ziffer 7" aria-label="Emoji: Tastenkappe Ziffer 7"> Set up the Twitter stepNow let& #39;s set up the actual sharing part of this automation!https://abs.twimg.com/emoji/v2/... draggable="false" alt="✅" title="Fettes weißes Häkchen" aria-label="Emoji: Fettes weißes Häkchen"> Select Create Tweethttps://abs.twimg.com/emoji/v2/... draggable="false" alt="✅" title="Fettes weißes Häkchen" aria-label="Emoji: Fettes weißes Häkchen"> Select your accounthttps://abs.twimg.com/emoji/v2/... draggable="false" alt="✅" title="Fettes weißes Häkchen" aria-label="Emoji: Fettes weißes Häkchen"> Insert the "Note" info to the Message boxhttps://abs.twimg.com/emoji/v2/... draggable="false" alt="✅" title="Fettes weißes Häkchen" aria-label="Emoji: Fettes weißes Häkchen"> Add a line, then add "Link" to the Message box too">
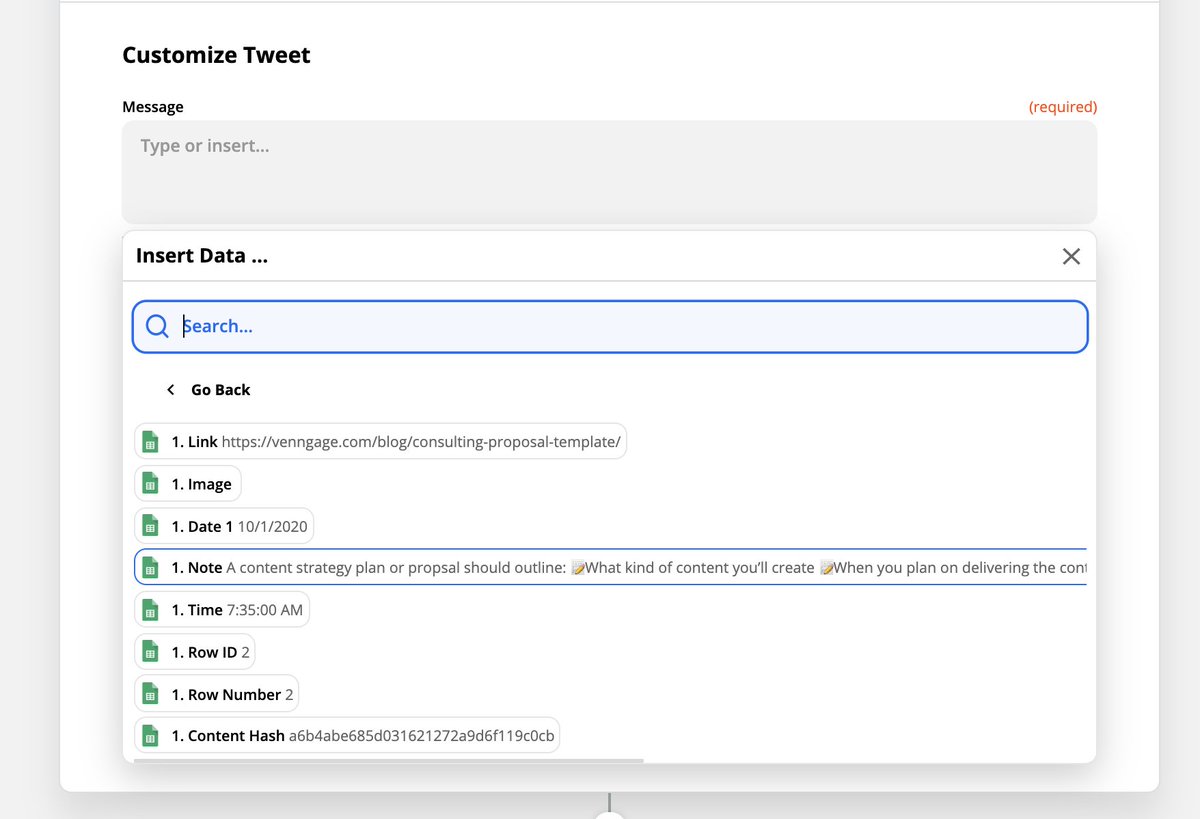 Set up the Twitter stepNow let& #39;s set up the actual sharing part of this automation!https://abs.twimg.com/emoji/v2/... draggable="false" alt="✅" title="Fettes weißes Häkchen" aria-label="Emoji: Fettes weißes Häkchen"> Select Create Tweethttps://abs.twimg.com/emoji/v2/... draggable="false" alt="✅" title="Fettes weißes Häkchen" aria-label="Emoji: Fettes weißes Häkchen"> Select your accounthttps://abs.twimg.com/emoji/v2/... draggable="false" alt="✅" title="Fettes weißes Häkchen" aria-label="Emoji: Fettes weißes Häkchen"> Insert the "Note" info to the Message boxhttps://abs.twimg.com/emoji/v2/... draggable="false" alt="✅" title="Fettes weißes Häkchen" aria-label="Emoji: Fettes weißes Häkchen"> Add a line, then add "Link" to the Message box too" title="https://abs.twimg.com/emoji/v2/... draggable="false" alt="7️⃣" title="Tastenkappe Ziffer 7" aria-label="Emoji: Tastenkappe Ziffer 7"> Set up the Twitter stepNow let& #39;s set up the actual sharing part of this automation!https://abs.twimg.com/emoji/v2/... draggable="false" alt="✅" title="Fettes weißes Häkchen" aria-label="Emoji: Fettes weißes Häkchen"> Select Create Tweethttps://abs.twimg.com/emoji/v2/... draggable="false" alt="✅" title="Fettes weißes Häkchen" aria-label="Emoji: Fettes weißes Häkchen"> Select your accounthttps://abs.twimg.com/emoji/v2/... draggable="false" alt="✅" title="Fettes weißes Häkchen" aria-label="Emoji: Fettes weißes Häkchen"> Insert the "Note" info to the Message boxhttps://abs.twimg.com/emoji/v2/... draggable="false" alt="✅" title="Fettes weißes Häkchen" aria-label="Emoji: Fettes weißes Häkchen"> Add a line, then add "Link" to the Message box too">
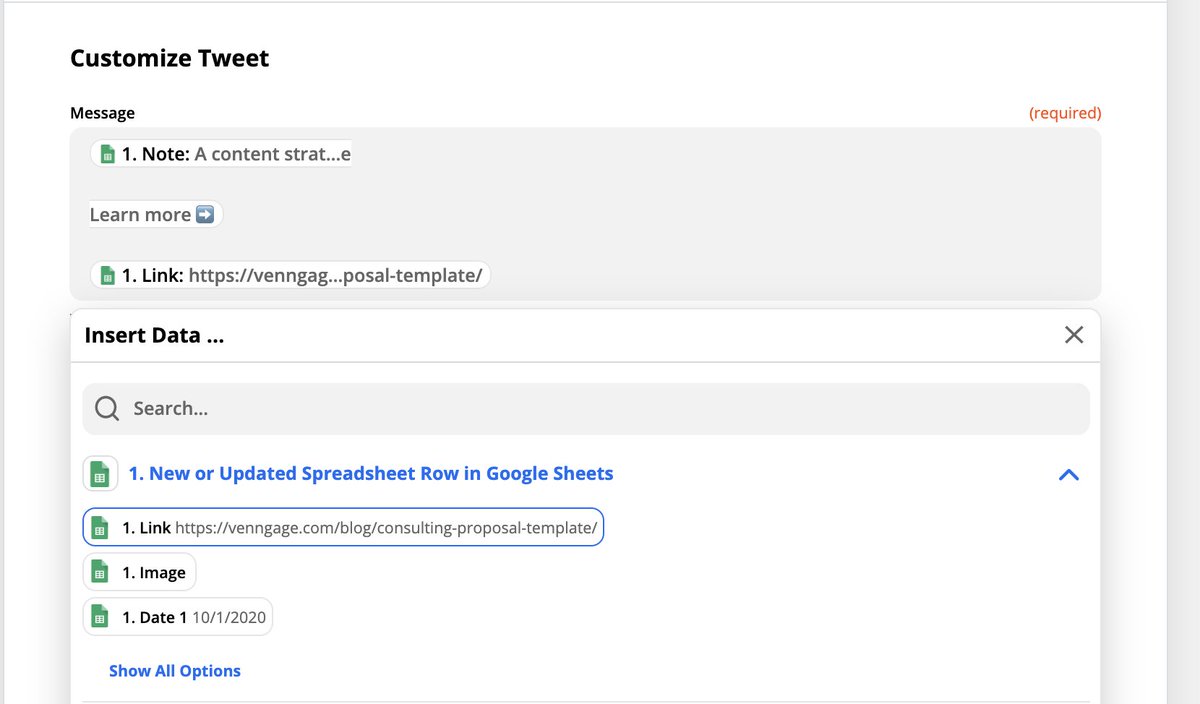 Set up the Twitter stepNow let& #39;s set up the actual sharing part of this automation!https://abs.twimg.com/emoji/v2/... draggable="false" alt="✅" title="Fettes weißes Häkchen" aria-label="Emoji: Fettes weißes Häkchen"> Select Create Tweethttps://abs.twimg.com/emoji/v2/... draggable="false" alt="✅" title="Fettes weißes Häkchen" aria-label="Emoji: Fettes weißes Häkchen"> Select your accounthttps://abs.twimg.com/emoji/v2/... draggable="false" alt="✅" title="Fettes weißes Häkchen" aria-label="Emoji: Fettes weißes Häkchen"> Insert the "Note" info to the Message boxhttps://abs.twimg.com/emoji/v2/... draggable="false" alt="✅" title="Fettes weißes Häkchen" aria-label="Emoji: Fettes weißes Häkchen"> Add a line, then add "Link" to the Message box too" title="https://abs.twimg.com/emoji/v2/... draggable="false" alt="7️⃣" title="Tastenkappe Ziffer 7" aria-label="Emoji: Tastenkappe Ziffer 7"> Set up the Twitter stepNow let& #39;s set up the actual sharing part of this automation!https://abs.twimg.com/emoji/v2/... draggable="false" alt="✅" title="Fettes weißes Häkchen" aria-label="Emoji: Fettes weißes Häkchen"> Select Create Tweethttps://abs.twimg.com/emoji/v2/... draggable="false" alt="✅" title="Fettes weißes Häkchen" aria-label="Emoji: Fettes weißes Häkchen"> Select your accounthttps://abs.twimg.com/emoji/v2/... draggable="false" alt="✅" title="Fettes weißes Häkchen" aria-label="Emoji: Fettes weißes Häkchen"> Insert the "Note" info to the Message boxhttps://abs.twimg.com/emoji/v2/... draggable="false" alt="✅" title="Fettes weißes Häkchen" aria-label="Emoji: Fettes weißes Häkchen"> Add a line, then add "Link" to the Message box too">
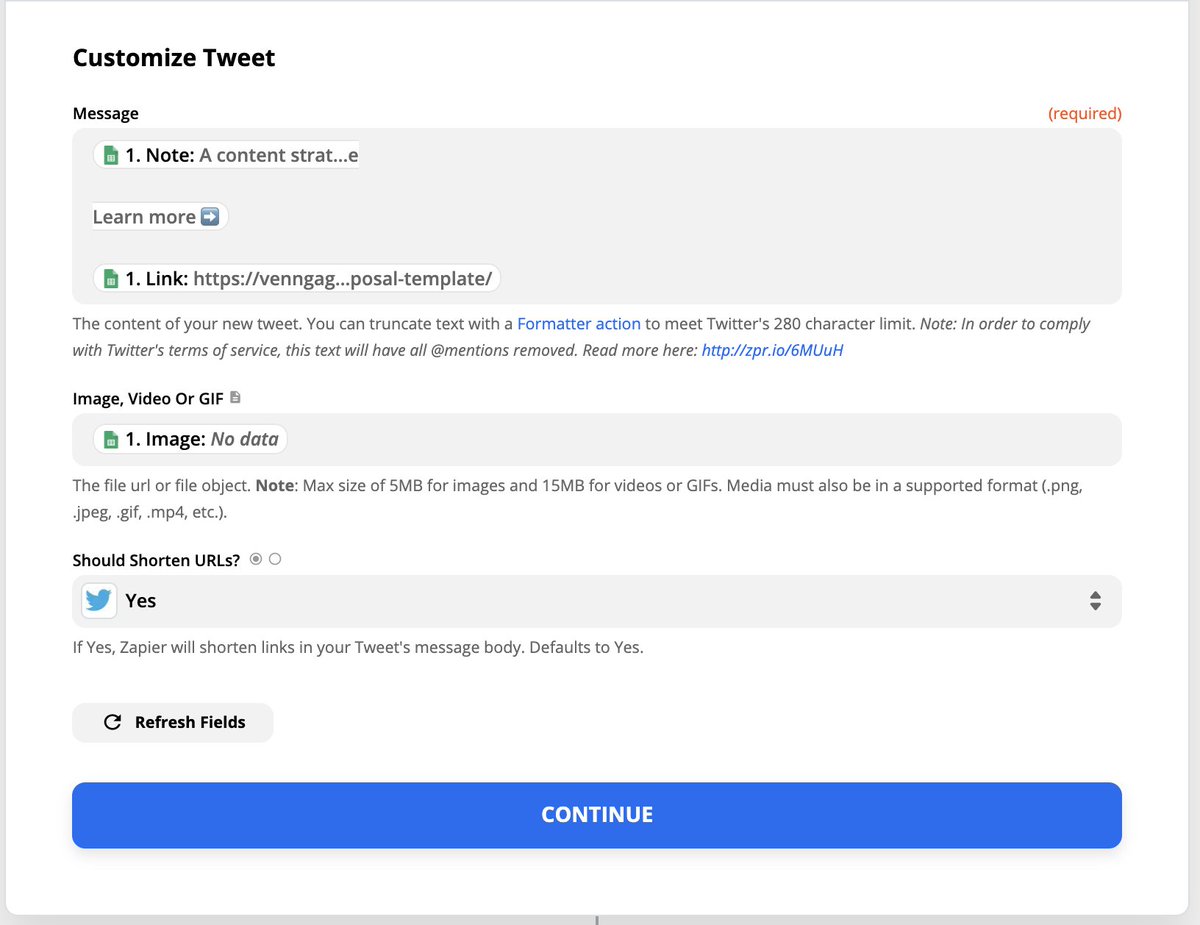
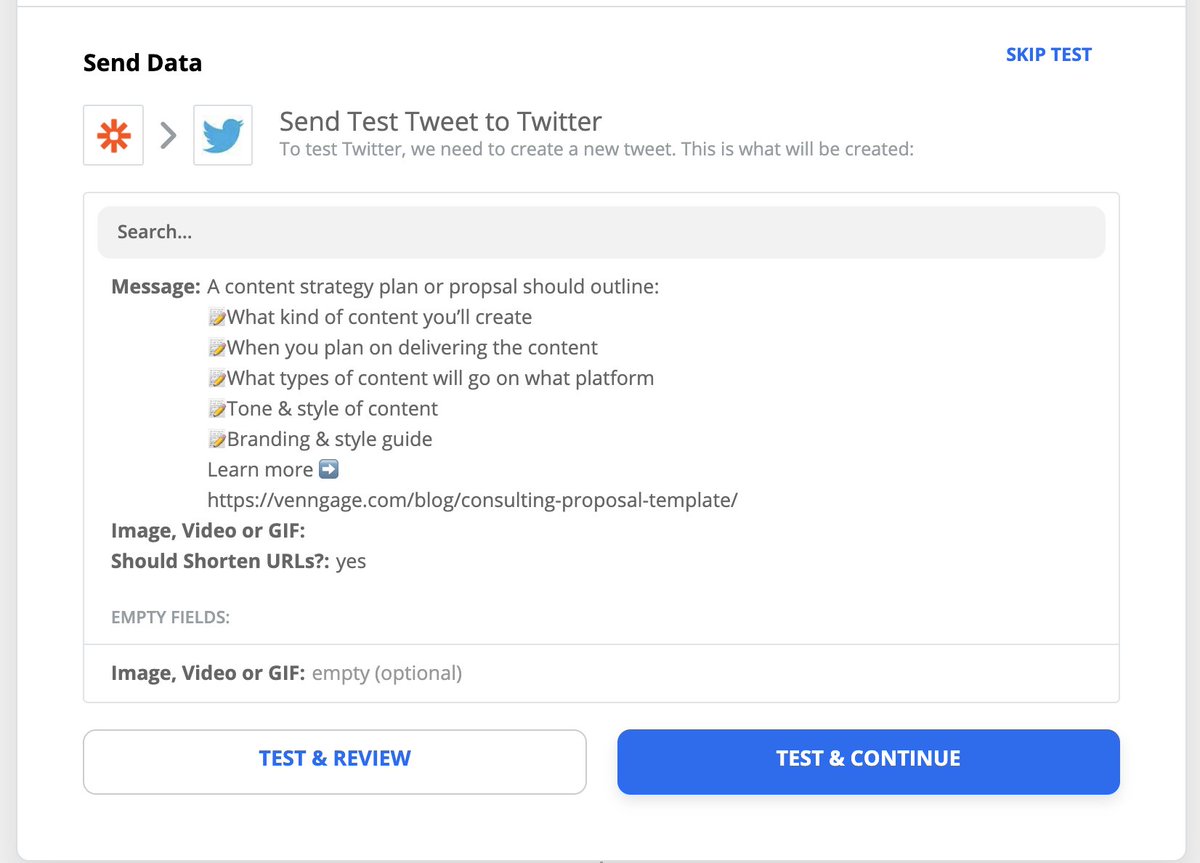 Test it outAfter you click continue, make sure to Test the Zap.As you can see, it was a successful test!You can now set the Zap live if you want." title="https://abs.twimg.com/emoji/v2/... draggable="false" alt="8️⃣" title="Tastenkappe Ziffer 8" aria-label="Emoji: Tastenkappe Ziffer 8"> Test it outAfter you click continue, make sure to Test the Zap.As you can see, it was a successful test!You can now set the Zap live if you want.">
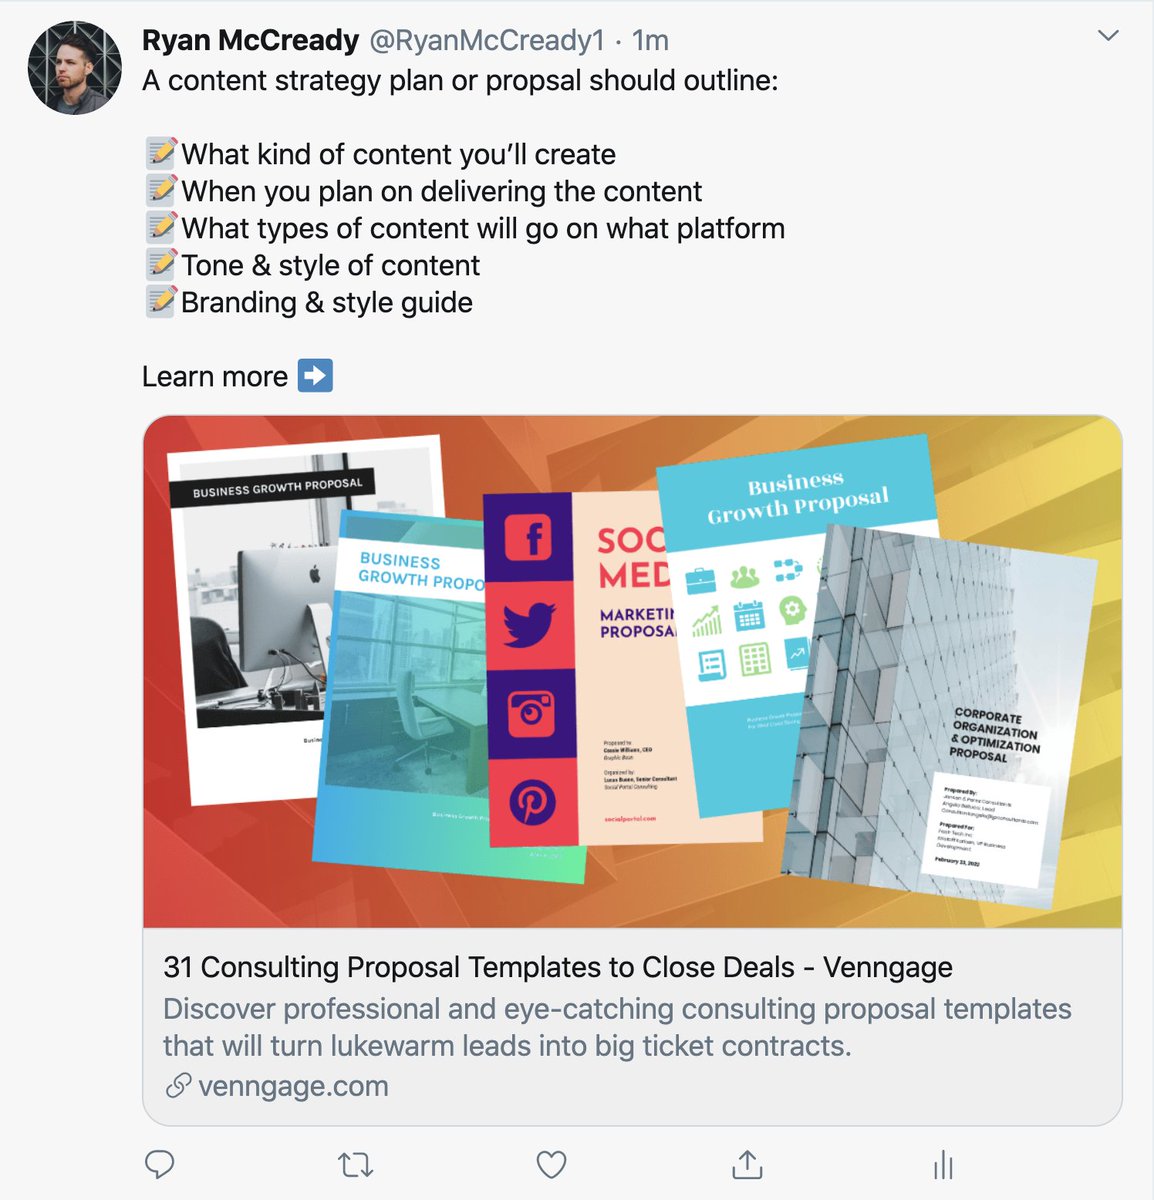 Test it outAfter you click continue, make sure to Test the Zap.As you can see, it was a successful test!You can now set the Zap live if you want." title="https://abs.twimg.com/emoji/v2/... draggable="false" alt="8️⃣" title="Tastenkappe Ziffer 8" aria-label="Emoji: Tastenkappe Ziffer 8"> Test it outAfter you click continue, make sure to Test the Zap.As you can see, it was a successful test!You can now set the Zap live if you want.">
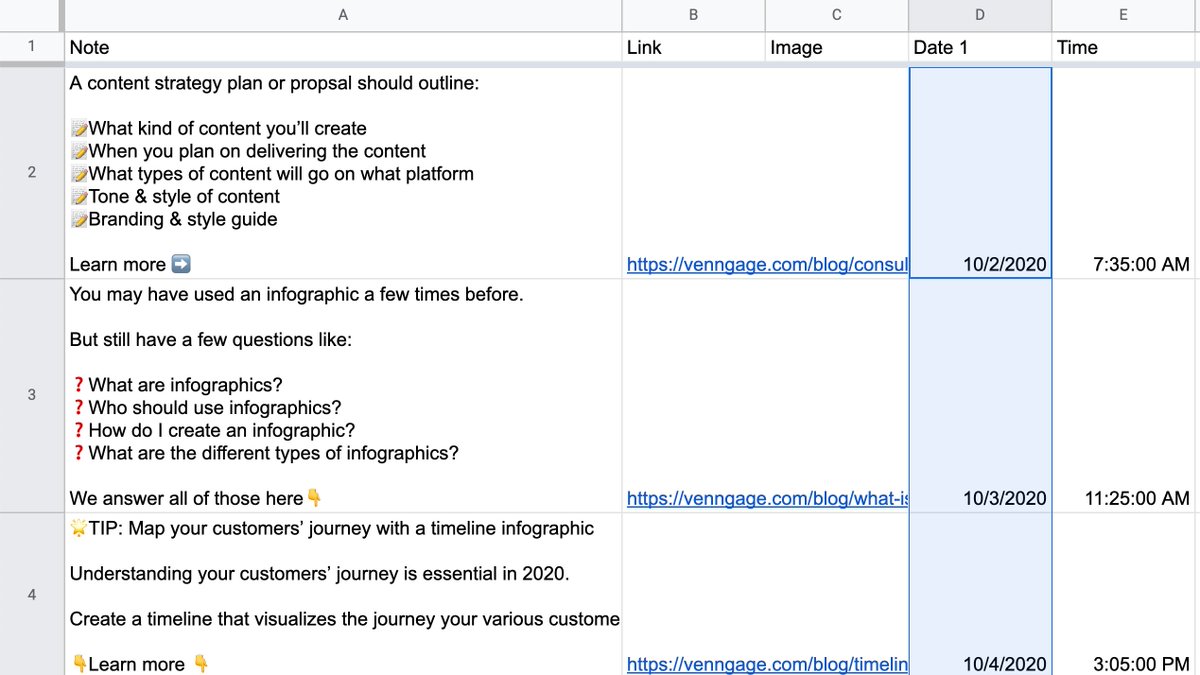 Organize the contentI would recommend writing all your shares in a separate Google Sheet tab & copying them into the Sharing sheet once they are ready.I use one called Staging in all my automation sheets.This allows me to get everything perfect & avoid accidental shares." title="https://abs.twimg.com/emoji/v2/... draggable="false" alt="9️⃣" title="Tastenkappe Ziffer 9" aria-label="Emoji: Tastenkappe Ziffer 9"> Organize the contentI would recommend writing all your shares in a separate Google Sheet tab & copying them into the Sharing sheet once they are ready.I use one called Staging in all my automation sheets.This allows me to get everything perfect & avoid accidental shares." class="img-responsive" style="max-width:100%;"/>
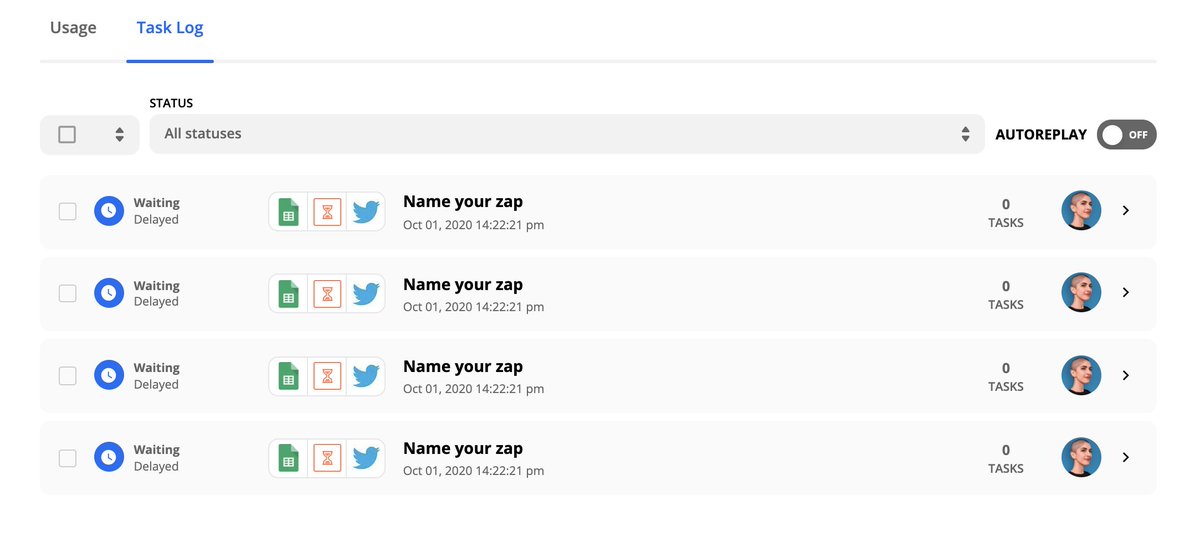 Share, share, share!Once you have got all your shares ready in the Staging tab, just copy them over to the main page. @zapier will see the new rows & run the Zap that you set up! And don& #39;t worry, the Delay step makes sure your content is shared at the specified time." title="https://abs.twimg.com/emoji/v2/... draggable="false" alt="🔟" title="Taste 10" aria-label="Emoji: Taste 10"> Share, share, share!Once you have got all your shares ready in the Staging tab, just copy them over to the main page. @zapier will see the new rows & run the Zap that you set up! And don& #39;t worry, the Delay step makes sure your content is shared at the specified time." class="img-responsive" style="max-width:100%;"/>


