
 Read on Twitter
#acnh  https://abs.twimg.com/hashflags... draggable="false" alt=""> terraforming tips thread inspired by @inacnh who did a similar thing, i& #39;m no professional but i& #39;m more and more at peace with my terraforming so thought i& #39;d share some tips. it might be a lil while before this thread is finished but here we go https://abs.twimg.com/emoji/v2/... draggable="false" alt="🥰" title="Smiling face with 3 hearts" aria-label="Emoji: Smiling face with 3 hearts">
 terraforming tips thread inspired by @inacnh who did a similar thing, i& #39;m no professional but i& #39;m more and more at peace with my terraforming so thought i& #39;d share some tips. it might be a lil while before this thread is finished but here we go https://abs.twimg.com/emoji/v2/... draggable="false" alt="🥰" title="Smiling face with 3 hearts" aria-label="Emoji: Smiling face with 3 hearts">" title=" #acnh https://abs.twimg.com/hashflags... draggable="false" alt=""> terraforming tips thread inspired by @inacnh who did a similar thing, i& #39;m no professional but i& #39;m more and more at peace with my terraforming so thought i& #39;d share some tips. it might be a lil while before this thread is finished but here we go https://abs.twimg.com/emoji/v2/... draggable="false" alt="🥰" title="Smiling face with 3 hearts" aria-label="Emoji: Smiling face with 3 hearts">" class="img-responsive" style="max-width:100%;"/>
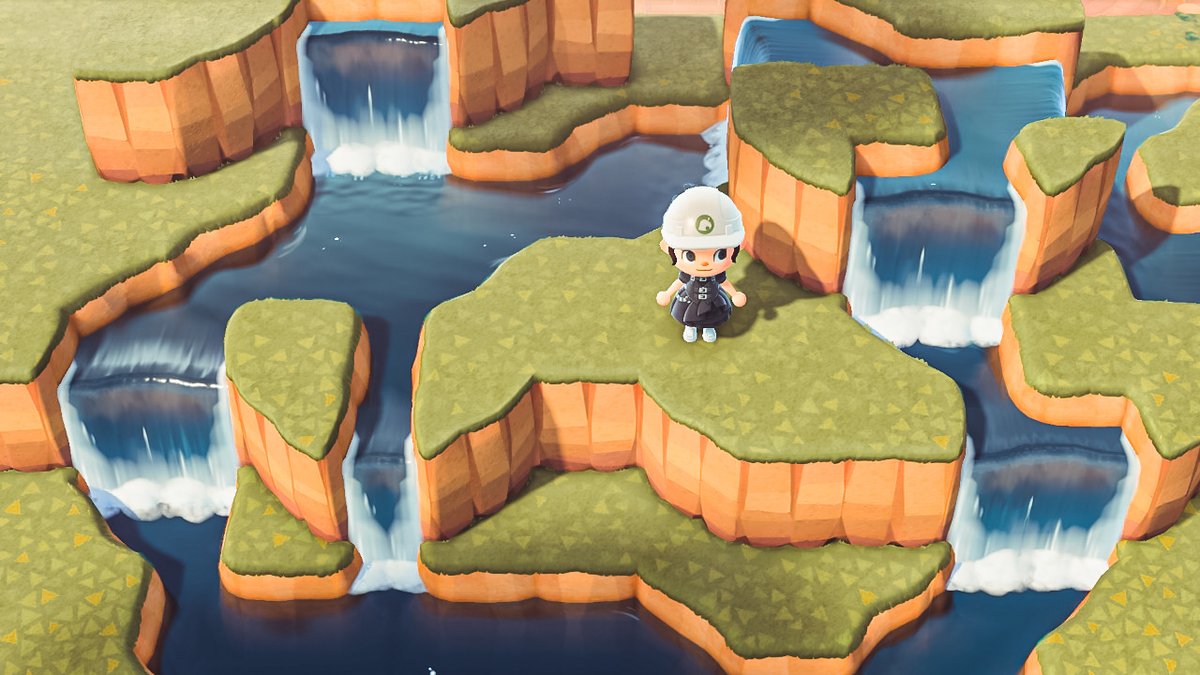
when it comes to waterfalls and cliffs you always wanna change up the direction and depth of things. like in the first photo most of the waterfalls are on the same line of cliff, and there are no diagonals which makes it flow less naturally.


it& #39;s also about making bumpouts and cutouts! a natural cliff isn& #39;t usually a straight line. make some stick outs or bumps inbetween waterfalls or around the place, it& #39;ll also make decorations put there look less structured!
here is another example. including, you should change the width of your waterfalls! some can be bigger, some can be smaller. it& #39;ll add dimension and it just looks good to me idk. and here you can also see i& #39;ve got land sticking out some places in the river!


small tip for the top as well: make it into a lil pond or even better, if you have space for it, connect the waterfall in the front to one behind! it& #39;s my go to for small areas like these, really makes it feel 3D and easy to do if you struggle with making natural ponds or rivers

as for rivers you want to keep the same things in mind! make some of it square, some of it diagonal, it& #39;ll look a lot more natural if you compare the two rivers in the image - one is diagonal but still looks structured - due to the lack of variety. nature hates symmetry iguess??

as for flowers it& #39;s a good tip to change the flowers up! you also want to think about placement, in the first photo they& #39;re all lined up and packed tight - in the second, there& #39;s variety in types and colors, including some breathing room between some of the flowers.


cliffs and waterfalls are great for making your island more natural, so don& #39;t be scared to use different levels in one area! i prefer having my building switch between being on level 1 or 2 as it makes for more possibilities to make the area interesting with cliffs/waterfalls.

building cliff areas for buildings: start small! from there u can use paths to figure out where the building will go while you plan the waterfalls and cliffs around it. there& #39;s a great guide for building sizes here: https://twitter.com/miibeatrice/status/1255780842951016449">https://twitter.com/miibeatri...
spacing between buildings (w/wo terraforming! in my shopping area above, nook& #39;s cranny is 4 tiles behind able sisters, and there are two tiles between them horizontally. it& #39;s a bit tight infront of nook& #39;s cranny, but i prioritized being able to see them both at once for depth.
i just prefer having other buildings visible in the background for depth and a natural look. so if you feel you have too little space for terraforming, try making smaller rivers, i& #39;m talking 1 tile rivers, and find a placement for pretty rivers behind the entire area!


in the pictures above there is aproximately around 6-7 tiles from the back of the first house to the front of the next house to the right. i usually build neighborhoods in zig zag for a more interesting layout, but also to create more space for terraforming inbetween houses!
symmetrical residental areas are super cute! but if you& #39;re hoping for more natural scenery around them, and more waterfalls/cliffs around the place i& #39;d recommend zig zag as it allows for bigger spaces between houses to play around with! and natural paths and river shapes
as for a natural path you want to add more elements! i usually stick to doing a zigzag pattern here as well, as it makes it a lot easier for all non-straight paths. i also add some fake flowers around/on my paths, maybe stones sometimes. adding a more natural look for my style.


also for paths, being able to change the details from flowers to stone can help change the vibe of the area whilst still carrying the same path color and style! and to me, having it zigzag makes the paths feel less heavy??
with inclines, you want to make them look a part of your cliff. i prefer having my cliff be 2 tiles into the cliff, so it& #39;s just sticking out slightly and it doesn& #39;t feel random, and adding curves to the cliffs surrounding it! that way it feels nestled perfectly where it& #39;s added.


this is a mess there& #39;s no plan here, however, getting started with planning: usually it& #39;s a good idea to flatten your island completely, move your houses to the beach and get rid off trees and flowers and all cliffs/rivers.
if that idea scares you too much - start with an area you already like, improve it and work around it! or start with the airport and work your way up. that way you& #39;re sure to have a better flow to your island as you& #39;ll be going through it from the airport the entire process!
as for planning your areas and flow - happy island designer comes highly recommended! it lets you plan out your entire map. https://eugeneration.github.io/HappyIslandDesigner/">https://eugeneration.github.io/HappyIsla...
as for more spesific areas - there& #39;s a 3D planner available for when you want to start making an elaborate waterfall! it lets you see how it& #39;ll turn out, saving you from taking 30 attempts on one area lmao https://bobacupcake.itch.io/island-planner ">https://bobacupcake.itch.io/island-pl...
and look for lots of inspiration! there& #39;s no harm in taking ideas from others! in the end you& #39;ll have so many different ideas mixed together from yourself and from inspo found online, that you& #39;ll island will be unique either way. and don& #39;t get too hung up on a style
i wanted to have cottagecore so badly when i started my island, but now it& #39;s less defined and i& #39;m loving it a lot more! i like what i like, and some areas are more dark woods themes, whilst some are more cute. it& #39;s okay to have a style, but don& #39;t let yourself be limited by it!
more to come once i finish making more examples!!
if anyone has any suggestions for stuff they& #39;d like to see advice on here, don& #39;t be scared to comment! https://abs.twimg.com/emoji/v2/... draggable="false" alt="🥰" title="Smiling face with 3 hearts" aria-label="Emoji: Smiling face with 3 hearts">
now imma use this flat lil area i just made as an example for how i& #39;d go about terraforming it, for if you already have areas you like but u& #39;d like to add levels and rivers and waterfalls to it!

i& #39;d usually look for where i& #39;d like to define the areas - there are plenty of ways to do this without terraforming, but for this i& #39;m using rivers! they nicely divide up the areas, and you can keep them open to enter or just jump over them (on my island u gotta jump a lot lmao)
")
i also like to add small cliff spots with waterfalls behind/between areas! the waterfall in the back is 3x7 in size, but really adds to the place. you can& #39;t see it in the photo, but to the left of it the waterfall flows down to the river that goes around the sitting area
i also like to add paths and see where the flow would go and add some darker dirt paths for some of the flower spots, but not all of them, as a mix between planted and natural growing flowers just makes more sense to me
next i add flowers and trees around the place (in the back i& #39;d like more trees but i was lazy ok), once you have the flowers down where you& #39;d like, you& #39;ll notice if there are spots that could use a small item extra like a lil birdcage here or there and such
, once you have the flowers down where you& #39;d like, you& #39;ll notice if there are spots that could use a small item extra like a lil birdcage here or there and such")
for example the area around the bench is feeling a lil empty to me, so i& #39;d add some small item i feel could add to the area!
and then i go ahead and place items in the lil areas i feel are empty, and add some more paths if i want to more strongly define an area - like with the brick stove! i also added a birdcage and some smaller items to fill in the space, and more details like the fence.

thanks guys so much for not letting this flop!! i made some of these areas just for the purpose of this post so omg ty guys https://abs.twimg.com/emoji/v2/... draggable="false" alt="😭" title="Loudly crying face" aria-label="Emoji: Loudly crying face"> i& #39;ll keep adding stuff once i do more https://abs.twimg.com/emoji/v2/... draggable="false" alt="🧡" title="Orange heart" aria-label="Emoji: Orange heart">
OKAY be patient with me as i terraform and decorate this lil neighborhood area


add some cliffs around the place, and round them out. i usually find that cliffs coming/growing from behind houses to the side of it looks good, and that way you minimize the amount of weird gaps (to the left i was thinking it might lead to another neighborhood area).
.")
.")
i made one of the cliff areas more rectuangular and one more round, the rectangular shape works great for backdrops whilst i find circular-ish shaped cliffs are better for when making cliffs and waterfalls in the middle of an area. takes less space, and makes it easier for seeing
add waterfalls and rounded out some corners. not all corners are rounded tho! with the waterfalls you gotta play around with it. at first i had the front waterfall right into to the house but the middle felt too heavy compared to the sides, so i moved it a lil more to the right.
next i added rivers to the waterfalls. in both the houses in the back - the river will be the separation between their garden and other areas. these are 1 tile wide, and 2 tile wide some places i made a half-river extra (??) where it felt too boxy.
 where it felt too boxy.")
 where it felt too boxy.")
 where it felt too boxy.")
the houses in the back are 7 tiles behind the front house btw! and 2 to the side on the left, whilst 3 on the right. that& #39;s also why i put the cliff to the right of the house - there was one tile extra to work with which can go a long way imo
the path goes in a u-shape down to the front house. if i were to make the neighboorhood bigger and continue up or down it& #39;d for me feel natural if it continue up to the left or down to the right - as the paths from these houses already seem to flow those directions!


usually when you put down paths it helps you see where the next area should be placed or where the entrance should be at least. this is also the time to see if you want any buildings moved, the path takes up space! so see if there are spots you& #39;d like more space in for decoration
back to cliffs, sorry for this MESS of a post - i usually make them a lil bigger than just what i need for waterfalls, to make room for flowers or other small decoration items. a cliff around the size of 5-6 x 3-4 tiles usually feels right to me in small areas.
that way there& #39;s space for waterfalls and decorations, making it feel less like a random cliff put there just for the waterfalls! it feels more included in the area.
a great thing about diagonal rivers, flowers lined up diagonally next to them usually look great, there& #39;s more space diagonally between spots, so they& #39;ll automatically have some breathing room, mixing diagonals and straight lines work great for flowers i think


here you can see more of the flowers diagonally and that not all of them are placed as close to each other! here i& #39;ve also added fences - now this is really more just my style but i like having single fences following paths/rivers or defining areas like the waterfall (left front)
")
")
")
")
you& #39;ll also see with zuckers lil garden area i didn& #39;t put two fences in the front on each side, it made it look like he could actually enter it without having to step on the flowers, so to me it feels a lil more realistic, and it also balanced it out more, as it felt less heavy!
once i added furniture and further decorations, i also added some more paths! i wanted areas to be more defined. i added small circles for seating areas with some rocks on them, and a more defined garden/spot for axels patio (?? idk the word)
")
")
")
")
if you have a large area with lots of things and it feels random - paths can really help in both the actual making of a path between things, but also defining areas like this! i don& #39;t have the before photo https://abs.twimg.com/emoji/v2/... draggable="false" alt="😭" title="Loudly crying face" aria-label="Emoji: Loudly crying face"> but the seating areas felt rly random to me before the paths
i also mix between natural flowers and potted flowers! you& #39;ll see to the right of the front house - i& #39;ve added a potted plant. and on top of the cliffs - i could put flowers on every spot, but it& #39;d feel too heavy to me, does that make sense??
as for flowers and colours you& #39;ll see i mix a lot but usually keep the colours in a colour scheme. i tend to mix reds with orange and yellow and then some white for contrast! going for similar colours with one pop out colour for contrast usually works for me!


